バーラップは非常に人気のある素材であり、多くの工芸品の可能性を提供します。家に素朴さを少し追加したい場合、または単に黄麻布の外観が好きな場合は、作成できるものがたくさんあります!
 黄麻布で作成できる100の簡単なDIYプロジェクトのリストを集めました。ベッドスカートやカーテンから枕、額縁、さらには結婚式の装いまで、これらの黄麻布の工芸品を簡単に組み合わせて、家を飾ったり、贈り物として贈ったりできます。
黄麻布は見つけやすく、比較的安価です(ジャガイモの袋を考えてください)、または地元の工芸品店で購入できます。また、最近ではさまざまな色で販売されているため、一般的に茶色がかった色が気に入らない場合でも、あなたの工芸品を完成させるために他の色を見つけることができます。黄麻布をつかんで、これらの素晴らしいプロジェクトの1つを始めましょう。
フェルトフラワーバーラップ枕
この小さな枕は、リビングルームやベッドルームに素朴な魅力を加えるのに最適な方法です。ソファの上に置いても、装飾的なベッド枕として使用しても、とても簡単に作ることができます。フェルトの花は最も複雑な部分ですが、それでも比較的簡単です。あなたは枕を作るのに十分な黄麻布、そしてもちろん、詰め物を必要とするだけです。これは非常に簡単なので、ソファを並べるためにいくつかを作成したり、特定のニーズに合わせてサイズを変更したりできます。
DIYの手順– Bet1975
バーラップキャンバス
これは写真やメモを保存するのに最適な素晴らしいプロジェクトです。キッチンに吊るして、洗濯バサミを使用して、スケジュールや重要なイベントに関するメモを保持できます。キャンバスを購入する必要があります。これはおそらく地元のダラーストアで入手でき、写真やノートカードを保持する洗濯はさみを固定するためのリボンまたはその他の布のトリムが必要になります。実際にこの全体を1時間未満でまとめることができ、レシピやそれに置きたいものだけを保持するのに最適です。
DIYの手順– Akadesign
シャビーローズのバーラップトート
トートバッグの数が多すぎることは決してありません。このバッグは完全に黄麻布でできており、かわいらしいぼろぼろのバラが横に付いています。バラは好きな場所に配置できますが、ストラップのすぐ隣に配置すると見栄えが良くなります。黄麻布から完全にほしくない場合を除いて、内側を覆う生地が必要になることに注意してください。多少の縫製も必要ですが、下水道を始めたとしても、これはあまり時間をかけず、この夏のビーチで使用できる美しいトートを提供する素晴らしい小さなプロジェクトです。
DIYの手順– Lamaisonreid
黄麻布とレースのテーブルランナー
秋のテーブルをドレスアップするなんて美しい方法でしょう!このレースと黄麻布のテーブルランナーは、美しいだけでなく、簡単に作ることができます。他の季節にもご利用いただけますが、秋のディナーや感謝祭にもぴったりです。とてもシンプルなプロジェクトでもあります。黄麻布を切り、レースを追加するだけです。幅広のレースを追加して幅を広くしたり、細いレースのボーダーを追加して小さくすることができます。特定の長さに合わせて長さを切り替えることもできます。これは、コーヒーテーブルやドレッサーにも最適です。
DIYの手順–お祝い
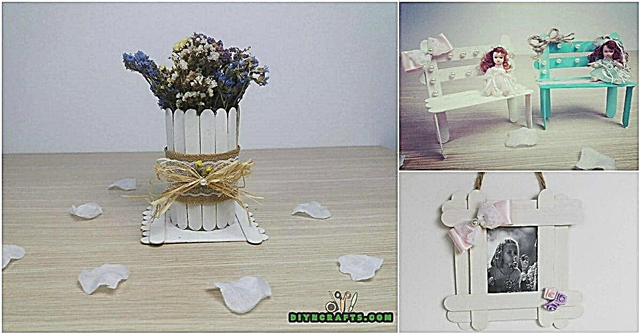
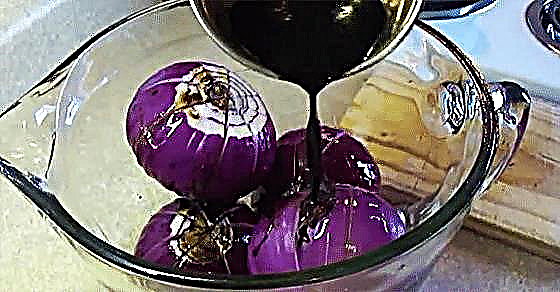
素朴な黄麻布の花瓶
この美しい花瓶は、実際にはアップサイクルされたブリキ缶で作られています。缶を完全に掃除してから、黄麻布全体を接着します。黄麻布をカットして縦にぴったりと収まるようにし、素敵なサテンまたはレースのリボンで締めます。また、トッパーをかぎ針編みにして、そこにリボンを通すこともできます。これらは、結婚式でテーブルに花を飾るのに最適です。または、夏に素敵な野生の花を抱えて家の周りにいくつか座ってもらうこともできます。少し熱い接着剤でバーラップとリボンをしっかりと固定します。
で利用可能:Etsyバーラップの素朴な花瓶
黄麻布のカーテン
吊り下げるためにこれらの美しい黄麻布のカーテンを作成したときにあなたの家が持つ素朴な外観を想像してみてください。あなたが寝室、リビングルーム、さらにはダイニングルームに何かを望んでいるかどうかに関係なく、これらをかなり素早く作ることができ、縫製は必要ありません。それらはパネルごとに約7ドルしかかかりません。これは店で購入したカーテンよりもはるかに安価で、これらは非常にユニークです。必要に応じて、さまざまなもので少し装飾したり、何も追加しなくても見栄えをよくしたりできます。
DIYの手順– Fourgenerationsoneroof
黄麻布の裏地付きの素朴なスライド式黒板
これは、家族のメッセージを整理するのに最適な素晴らしい陶器納屋の模造品です。メッセージを書くための黒板や、メモやレシピなど、便利なものをピンで留めるための黄麻布があります。 Pottery Barn(入手できなくなりました)のオリジナルの作品は$ 100を超えていましたが、プロジェクトの手持ちに応じて、約$ 10で自分で作ることができます。
DIYの手順– Prettyhandygirl
黄麻布のクリスマスのストッキング
クリスマスプロジェクトの時期は少し早いと思いますが、これはとてもかわいいので、言及する必要があります。今年のホリデーで素朴な外観に飾りたい場合、これらの黄麻布のストッキングは完璧です。ただ測定し、切り、縫い、そしてあなたが望むもので飾り付けてください。これらの縁取りのないフリルは愛らしい、本当に素朴な田舎風の雰囲気を与えています。あなたはあなたのマントルピースに必要な数だけこれらを行うことができます、またはあなたのポーチ装飾にそれらを追加することを想像してください。
DIYの手順– Dearlillieblog
ラッフルベッドスカート
この素晴らしいベッドスカートはフリルの負荷があり、家に本当の素朴な感触を追加したい人のための黄麻布で完璧です。スカートは実際には見た目よりもはるかに簡単に作ることができ、指示に基づいてキングサイズまたはクイーンサイズのスカートを作成できます。フルサイズまたはツインサイズのベッドスカートが必要な場合は、おそらくそれを削減することもできます。コーナーの小さな弓は本当にかわいいです、そしてこれがベッドの上にいくつかの黄麻布のデコレータ枕でどのように見えるかを想像してください。
で利用可能:Etsyラッフルベッドスカート
消去可能なディナーメニュー
このメニューは確かにあなたのキッチンをドレスアップするつもりです、そしてそれはそのような便利な小さな機能を果たします。 1週間に予定しているすべての食事を追跡できます。これにより、必要なものがすべて揃っていることを確認でき、すべてのディナーが完全に整理されます。プロジェクト自体はとても簡単で、好きな配色を使用して、キッチンのインテリアに完璧に合わせることができます。これらも素晴らしい贈り物になります。
DIYの手順– Bystephanielynn
陶器の納屋風のフレンチ枕
この豪華なモノグラムの枕は、どの寝室にもぴったりで、黄麻布の花の素敵な花束が付いています。すでに黄麻布と詰め物を手元にある場合、これは何の費用もかかりません。これは、モノグラムで約50ドルで実行できるPottery Barnバージョンよりもはるかに安価です。必要に応じて、ベッドやソファーをドレスアップするために、これらをより小さなバージョンで行うこともできます。完了までにほとんど時間がかかりません。
DIYの手順–プレートアディクトの告白
バーラップシャワーカーテン
あなたは、黄麻布のシャワーカーテンと愛らしいハンガーの両方を作ることができ、縫製のステッチは必要ありません。この小さなプロジェクトでは、布地の接着剤とアイロンを使用して、すべてを所定の位置に保ちます。カーテンフックの間の洗濯はさみはいい感じで、バスルーム全体が素朴で昔ながらの外観になっています。これはどのバスルームにとっても見栄えがよく、全体を完了するのに約5ヤードのバーラップしか必要としないため、特に数ヤードのバーラップをすでに手元に持っている場合は特に、非常に簡単で非常に安価です。
DIYの手順–ハーフベイクドホームメイキング
人類学に触発されたジュートハリケーンランタン
黄麻布の少し、庭のより糸とジュートロープ、その他いくつかの供給品を使って、この素晴らしい人類学ノックオフハリケーンランタンを作ることができます。フォームを作成するにはコンテナが必要ですが、古いアイスティーガロンをリサイクルできます。そのため、他のサプライ品を手元に置いていれば、1セントもかかりません。これらはあなたの屋外を飾るのに最適で、作るのは本当に簡単です。あなたはそれらのいくつかを行うことができ、本当にこの夏のスタイルでデッキを楽しませることができます。
DIYの手順–賛美歌集
バーラップリース
この素敵なバーラップリースを作成してさまざまな装飾を施すことができるので、一年中吊り下げたままにして、季節に合わせて少し変更することができます。リース自体の作成にはほとんど時間がかからず、必要なサプライはごくわずかです。黄麻布の材料をリースフォームに適用するか、必要に応じてワイヤーから作成し、必要な装飾を追加します。花輪をどの程度いっぱいにしたいかに応じて、数ヤードの黄麻布が必要です。フローラルワイヤーを使用して、木製のレタリングやその他の装飾を追加できます。
DIYの手順– Theturquoisehome
黄麻布プランター
これらの小さなプランターは簡単に作ることができ、素敵な春の花を飾るのに最適な方法です。ココファイバーライナーに花を植えたら、それをすべて黄麻布で「包み込み」、リボンまたはリボンを追加します。縁石の魅力を少しドレスアップしたい場合は、これらを地面に直接置くか、ポーチに置いておくことができます。それらをいくつかグループ化すると、簡単に実行でき、美しく見えます。
DIYの手順– Themotherhuddle
未縫製黄麻布のバランス
この素晴らしいバランスは非常に高価で非常にエレガントに見えますが、わずか1時間で作成でき、作成コストはほとんどかかりません。基本的には、窓を測定し、黄麻布を切り、窓に掛けるだけです。画鋲を使用して所定の位置に固定すると、黄麻布がタックを完全に隠して見えないようにします。ほつれたエッジは下部で見栄えがよく、好きなように価数を上げたい場所にどこかにネクタイを配置する必要があります。
DIYの手順– 11magnolialane
バーラップ掲示板
この素晴らしいバーラップ掲示板は、作成が非常に簡単で、非常に安価です。コルクボードが必要です。コルクボードは、地元のダラーストアでほんの少し、ステープルガン、いくつかの室内装飾品のタック、および黄麻布のヤードで入手できます。通常のコルクボードを黄麻布で覆い、張りの鋲を使って少し装飾を加えます。これはキッチンに最適で、組み立てにほとんど時間がかかりません。レシピ、請求書など、ここに固定したいものは何でも保管して、重要なタスクをスタイリッシュに思い出してください。
DIYの手順– Tidymom
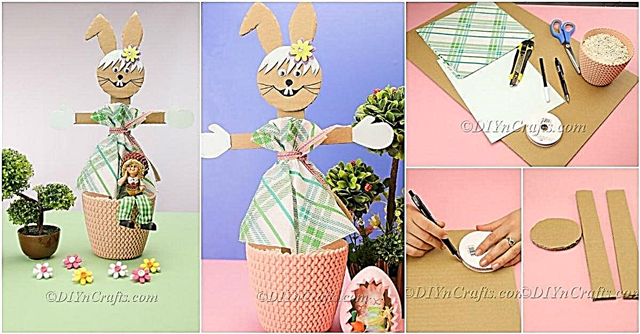
ホワイトバーラップバニーズ
イースターのための本当にユニークなプロジェクトを探しているのか、バニーを絶対に崇拝しているのかに関わらず、この簡単なバーラップバニープロジェクトはきっと気に入るはずです。白でこれらを実際に行う必要はありません。自然の黄麻布(またはそのほかの色)を好む場合は、好きな色を使用できます。黄麻布からウサギの形を切り取り、手で縫い、閉じる前に塗りつぶすだけです。手作りのイースターバスケットや、気まぐれで本当にかわいい装飾をしたい場所に最適です。
DIYの手順–交差点のコテージ
人類学に触発された波立たせられたランプシェード
あなたの家のどの部屋でも完璧に見えるこの美しい波立たせられたランプシェードを作るために必要なのは、約1ヤードと黄麻布の半分だけです。あなたはすでに持っている古いランプベースを使うか、地元のリサイクルショップやヤードセールで1ドルか2ドルを拾うことができます。次に、ベースに好きな色を塗って、Anthropologieにインスパイアされたシェードに取り掛かります。これを縫う必要さえありません。生地の接着剤を使用してフリルをまとめることができ、美しいだけでなく作成も簡単です。
DIYの手順– Tatertotsandjello
黄麻布のカボチャ
秋まで待って、これらの愛らしい小さな黄麻布のカボチャの作成を開始してください。これは、さまざまなサイズの負荷で実行できます。これらは、内側または外側を飾る秋に最適です。それらを作るには少し縫製が必要ですが、見た目よりもはるかに簡単で、本当にカラフルで大胆なディスプレイを作成したい場合は、さまざまな色で行うことができます。黄麻布をカボチャにする前に、黄麻布を少しシャーピーやその他のマーカーで少し飾って、本当にユニークなディスプレイを作成することもできます。
DIYの手順–更新更新
バーラップ用具ホルダー
これらの小さな道具ホルダーは、感謝祭のディナーテーブルをドレスアップするのに最適です。もちろん、感謝祭まで使用したくない場合は、夏の集まりにも最適です。彼らは作るのが非常に簡単であり、あなたは何も縫う必要はありません。あなたはそれらをホットグルーガンで一緒にして、装飾や名前タグ、またはあなたがそれらを装飾したい他のものを追加することができます。ひもの小さな断片は、ディナーのゲストと共有したい名前や特別なメッセージを追加するのに最適です。
DIYの手順– Iheartnaptime
バーラップラップされた花瓶
黄麻布のストリップ、無地のガラスの花瓶、小さなレースを使用すると、結婚式や家のどこにでも適した美しい黄麻布で覆われた花瓶を作成できます。白いペンキで花瓶に画像や言葉を簡単にステンシルで塗ってから、白いレースを使ってそれらを結び付けることができます。このプロジェクトでは、花瓶をカバーしたり、ワインボトルなど、花瓶にしたいものをリサイクルしたりできます。迅速かつ簡単で、費用もほとんどかかりません。黄麻布やその他の備品が少しでもあれば、何も起こりません。
DIYの手順–魅力的
DIYバーラップフラグ
この旗は、あなたの家にちょっとユニークなものが掛かっている場合や、屋外の旗としても使用できる場合に最適なプロジェクトです。黄麻布を必要なサイズにカットし、ステンシルでメッセージや画像を追加し、ジュートロープを追加して旗を掛けます。このプロジェクト全体は1時間もかからず(もちろん、使用するメッセージと単語の適用方法によって異なります)、黄麻布と便利なペイントがあれば費用はかかりません。
DIYの手順– Thewoodgraincottage
バーラップカップケーキラッパー
黄麻布で裏打ちされたカップケーキは、結婚式や、おいしいカップケーキにちょっとした特別な何かを加えたいときに最適です。あなたが黄麻布をテーマにした結婚式を計画している場合、これらはあなたのウエディングケーキの隣にすばらしく見えます。黄麻布をカップケーキのラッパーテンプレートに接着し、カップケーキをその上に配置するだけです。シンプルなジュートや麻ひもが真ん中からすてきに見えますが、必要な装飾の種類を追加できます。
バーラップキャンドルホルダー
これらの小さなキャンドルホルダーは、秋の装飾に最適ですが、他の季節にも美しく見えます。黄麻布をカットして、ガラス製のキャンドルホルダー(またはガラス製の容器)を覆い、必要に応じて装飾するだけです。どんぐりは正面の中央全体によく見えますが、装飾に想像力を使うことができます。黄麻布を瓶の周りに巻き付けて所定の位置に接着し、前面に撚り線リボンを追加して、見栄えをよくします。
DIYの手順– Victoriabrikho
バーラップコースター
黄麻布のコースターは、内側または外側に最適です。これらを使用して、夏の屋外ディナーパーティーをドレスアップしたり、内部に置いておいたりして、液体が木の表面に付着しないようにすることができます。大きな部分は、作成が本当に簡単なことです。手持ちの黄麻布が少ししかない場合でも、これらの費用はまったくかかりません。コースターのベースを作成するには、ある種の素材の正方形が必要です。その後、黄麻布を追加して、好きなように装飾するだけです。ペイントはうまく機能し、黄麻布に直接ペイントできます。
DIYの手順– Alyssaandcarla
イヤリングディスプレイ
この素晴らしいイヤリングディスプレイは黄麻布から作られ、額縁に設置されます。作成はとても簡単で、額縁を1ドル程度で手に入れることができるので、非常に安価です。黄麻布をフレームのつや消しにホチキス止めして、フレームに好きな色を塗るだけです。釣り針留めのあるイヤリングは黄麻布の中にすべり込み、他のタイプのイヤリングをここに置くこともできます。少し時間をかけてそれをカスタマイズしてください。これは、自分が何をすべきかを知っているよりも多くのイヤリングを持っている人にとって素晴らしい贈り物になります。
DIYの手順– Cucicucicoo
黄麻布で覆われたキッチンチェア
古いキッチンチェアに黄麻布をかぶせることで素晴らしい変身を与えましょう。布張りの経験があまりなくても、これはかなり簡単なプロジェクトです。黄麻布をカットしてから、それをシーティングエリアに取り付けて、古い布をカバーするか、最初に古い部分を取り除くことができます。必要に応じて、もう少しパッドを追加して、椅子をより快適にすることもできます。これは素晴らしい週末のプロジェクトです。特に、黄麻布ですべてのキッチンチェアを取り戻したい場合はそうです。椅子が1つしかない場合でも、数時間はかかりません。
DIYの手順– Boyohboyohboycrafts
ポケット付きバーラップコルクボード
カバーする古いコルクボードを持っている場合でも、ドルストアでコルクボードを1つピックアップする場合でも(それぞれ1ドル程度)、これは通常のメモボードを少し後押しする素晴らしいプロジェクトです。黄麻布は特定の場所で折りたたまれているため、写真や手紙など、必要なものを何でも入れておくことができます。画鋲を使って上に物を置くこともできるので、整理整頓に役立ち、小さなポケットは外出先でも非常に便利です。
DIYの手順– Uncommondesignsonline
黄麻布の小袋を縫い付けない
サシェはドレッサーの引き出しに追加し、あなたの服の匂いを素晴らしく保つのに最適です。これらの小さな黄麻布の小袋は、新鮮なラベンダーで満たされており、まったく縫製を一切必要としません。彼らは引き出しやクローゼットに最適です。または、あなたがそれらを作り、贈り物としてそれらを配ることができます。黄麻布からポケットを作り、ラベンダーを加えて、接着するか結びます。必要に応じて少し装飾したり、ラベンダーを外側に置いたりできます。
DIYの手順– Onsuttonplace
ラッフルバーラップテーブルクロス
この美しいテーブルクロスは、約12ヤードの黄麻布と、その下に数ヤードのモスリン生地を必要とします。ロマンチックなディナーにぴったりの素敵なフリルがあり、ダイニングルームのテーブルでいつも美しく見えます。必要に応じてレースやその他の装飾的な素材を追加することもできますが、見た目はとても良いです。少し縫製する必要がありますが、屋外のダイニングテーブルでこれはどのように素晴らしいでしょうか。または、休日にも使用できます。
DIYの手順–日常生活を祝う
バーラップバニーバッグ
紫色のバニーが付いたかわいい小さなトートバッグ(またはあなたが好きな色を作ることができます)はこのイースターによく似合います。イースターエッグハントにこれを使用したり、必要に応じて財布として運ぶことができます。これは比較的簡単に作れるバッグです。ウサギにかわいいコットンテールを追加して、本当に愛らしいものにすることもできます。このプロジェクトでは、すでに製造されている黄麻布の袋が必要ですが、簡単に自分で作ることができ、さまざまな色の黄麻布でこれらを作成して贈り物としてプレゼントすることもできます。
DIYの手順– Thecasualcraftlete
バーラップバナー
この秋(または春、夏、または冬)を、簡単に自分で作成できる美しい黄麻布のバナーで飾ります。バナー用のピースを切り取り、言いたいことをステンシルで留め、ジュートまたは糸を各ピースに接着して、それらをまとめて吊るします。これはクリスマスや感謝祭のバナーとして本当にいいでしょう、あるいはあなたがそれをバニーやあなたが追加したい他のものでイースターバナーに簡単に変えることができます。
DIYの手順– Iheartnaptime
イージーアウトドアバーラップラグ
黄麻布、アクリル絵の具、ステンシル、アクリルコークをいくつか使って、夏の楽しみのために本当に素敵なアウトドアラグを作りましょう。コーキングは、黄麻布の端がほどけるのを防ぎ、敷物に身体を与えるのに役立ちます。あなたは好きなデザインをすることができ、自然が本当にあなたの屋外の装飾と合わないなら、あなたは異なる色の黄麻布を選ぶことができます。これは美しい敷物であり、作るのにほとんど時間がかかりません。デッキやパティオに追加すれば、アウトドアの装飾に活気が生まれます。
DIYの手順– Apartmenttherapy
バーラップコーヒーバッグカーテン
あなたはバーラップから作られた古いコーヒーバッグをインターネットで簡単に見つけることができます、そしてあなたがカップルを手にしたら、あなたはキッチンのためにこれらの愛らしいコーヒーバッグのバランスを作ることができます。プロジェクトの要点は本当に簡単です。あなたはちょうどあなたの黄麻布が適切なサイズであることを確認するためにあなたの窓を測定する必要があり、それからハンガーを作成してカーテンの棒の上にバランスを吊るします。縫う必要すらありません。必要に応じて生地のりを使用でき、リングはクリップで取り付けることができます。
DIYの手順– Debbie-debbiedoos
素朴な黄麻布のオスマン
あなたが張り替える必要がある古いオットマンを持っているなら、バーラップでそれをしてみませんか?これは、ほぼすべてのリビングルームの装飾にマッチする優れた外観であり、実際には想像よりもはるかに簡単です。オットマンから生地を取り除き、それをカバーするのに十分な黄麻布で置き換え、側面に留めるために少し余分なものを持っているだけです。古いオットマンがない場合は、ヤードセールや地元の古着屋でかなり安いものを手に入れることができます。
DIYの手順– Lizmarieblog 
バーラップランドリーサイン
この黄麻布の標識はランドリールームで見栄えがよく、1日もかからずに簡単に仕上げることができます。吊るすにはフレームが必要です。また、かわいい麻布を黄麻布に直接印刷する必要もあります。信じられないかもしれませんが、黄麻布での印刷は非常に簡単で、通常のプリンターで印刷できます。この便利な小技を学んだら、あらゆる種類の物を黄麻布に印刷したくなるでしょう。印刷が終わったら、格言を額に入れて洗濯室に吊るします。
DIYの手順–国内で話す
黄麻布のリボンの木
クリスマスの飾り付けをする場合でも、コーヒーテーブルを飾るために本当にユニークなものを作りたい場合でも、これらの黄麻布のリボンの木は完璧で、簡単に作ることができます。フォームコーンを使用するか、ポスターボードからコーンを作成し、リボン付きの黄麻布をその周りに巻きます。春と夏の色を変えたり、ホリデーの緑と赤をクラシックにしたりできます。ワイヤーで縛られた黄麻布のリボンは非常にうまく機能し、所定の位置にうまく保持されます。さらに、さまざまな色で入手できます。
DIYの手順– Thegirlcreative
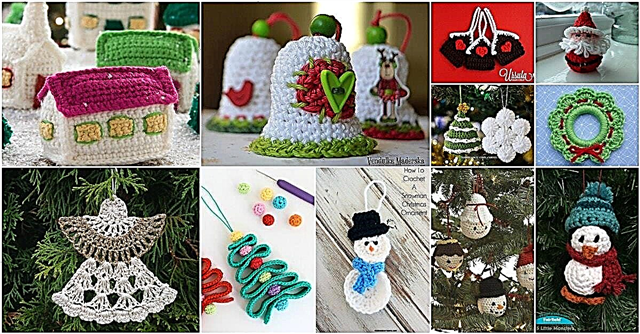
美しい黄麻布のクリスマスの天使
今こそクリスマスのためにそれらのユニークな装飾を作り始める時であり、この黄麻布の天使は素朴な表情を愛するなら必需品です。これらは素晴らしい贈り物にもなり、とても簡単にできます。翼にはワイヤー入りの黄麻布リボンが使用されており、他にもいくつか必要な物があります。彼らは作るのが本当に安価であり、あなたは完全にユニークな異なるスタイルを作ることができるので、あなたはそれらをいくつもの方法で装飾することができます。
DIYの手順– Uncommondesignsonline
ビーズバーラップナプキンリング
これらのナプキンリングは本当にエレガントで、ロマンチックなディナー、結婚式、またはちょっと特別なものが欲しいときに最適です。あなたが黄麻布でナプキンリングを作ることができるいくつかの異なる方法が実際にあり、それらはすべて比較的簡単です。ビーズの外観が気に入った場合は、黄麻布をカットしてビーズを追加し、両端を縫い合わせてリングを作成できます。縫製はおそらくこれの生地接着剤よりもうまく機能しますが、手で縫うことができるため、機械は必要ありません。
DIYの手順– Fabyoubliss
国の黄麻布の装飾
子供たちは黄麻布でこれらの愛らしい国のクリスマスの装飾品を作成するのを手伝ってくれるでしょう。これらの素敵な作品で完全に飾られたクリスマスツリーを想像してみてください。それらは作るのが簡単で、数ヤードの黄麻布素材からいくつかを得ることができます。キラキラ、ステンシル、その他の装飾品を使用して少し装飾するか、好きなようにそのままにしておくことができます。縫う必要はありません。代わりに布の接着剤を使用し、リボン、より糸、またはその他の紐を接着して木に固定します。
DIYの手順– Ttrinketsinbloom
黄麻布のトピアリー
これらの愛らしい黄麻布のトピアリーをさまざまなサイズで作成して、屋内外での使用に最適です。玄関のドアの外に立つために、かなり大きなものをいくつか作成します。または、小さなものを作成して、美しいセンターピースまたはテーブルディスプレイを作成することもできます。本当にカラフルなプランターに追加して、春に使用したり、白にして秋と冬に飾ったりできます。これらは素晴らしいです。彼らは作るのが簡単で、装飾の点で愛らしいトピアリーでそんなに多くすることができます。
DIYの手順–デザインとおむつ
ステンシルバーラッププレースマット
これらの簡単なDIYプレースマットを使用して、テーブルを本当にきれいに設定してください。必要なバーラップを適切なサイズにカットし、端に布の接着剤を加えてアイロンをかけるだけです。これにより、ほつれを防ぎ、必要なものにステンシルをかけることができます。家族の夕食のために家族の名前を1つずつ作成したり、休暇の特別なメッセージを作成したりできます。ほんの少しの時間とほんの少しの布地しか必要としないので、これらは素晴らしいです。数ヤードの黄麻布からいくつかを得ることができます。また、縫製が不要なので、とても簡単に作れます。
DIYの手順–ホームセッション
イースターバスケット壁掛け
まだ黄麻布からぶら下がっているこの愛らしいイースターバスケットの壁を作成する十分な時間があります。特定の工芸品を作成するときに、曲げたりねじったりするのがはるかに簡単で、非常にうまくくっつく有線の黄麻布リボンを使用できます。バスケットを作ったら、ひよこやバニーのぬいぐるみなど、追加したいもので飾ります。これはとても愛らしいプロジェクトで、信じられないほど簡単です。これを使用してドアを装飾します。夏の間ぶら下げたままにする場合は、イースターの装飾をスキップして、春の色を使用できます。
DIYの手順– Trendytree
黄麻布の雪だるまの壁掛け
約1時間ほどで、この3D雪だるまの壁掛けを作成して、クリスマスの飾り付けに最適になるか、ギフトとしていくつか作ることができます。黄麻布をフレームに取り付けて、雪だるまをペイントするだけです。それは本当に非常に少しの時間を要します、そしてあなたが利用可能ないくつかの黄麻布といくつかの小さなフレームを持っているなら、あなたはこれに何も費やす必要はありません。必要に応じて別のキャラクターでそれらを行うこともできます。クリスマスクラフトを始める準備がまだできていない場合は、夏のキャラクターまたはイースターバニーを実行してください。
DIYの手順– Howtothisandthat
バスケット織りバーラップテーブルランナー
このテーブルランナーは本当に複雑に見えますが、非常に簡単なプロジェクトです。見た目よりもはるかに簡単なバスケット織り効果を作成できる必要があります。作業を進めるときは、各パーツを接着して、完全に固定されるようにしてください。これはダイニングルームのテーブルに最適なランナーです。コーヒーテーブル、ドレッサー、または好きな場所に合わせてさまざまなサイズで作成できます。小さい方形のバージョンを作成して、ドイリーを置き換えます。
DIYの手順– Taradennis
黄麻布の額縁
これらの美しい黄麻布のフレームはとても簡単に作ることができ、それらを作るのに木材は必要ありません。段ボールに黄麻布をかぶせれば、額縁のように見える美しいフレームができます。これらは、あなたが知っている誰にとっても素晴らしい贈り物になるでしょう、そしてそれらはあなたが一日にいくつかを成し遂げることができるように作るのがとても簡単です。また、裁縫をする必要もありません。あなたは黄麻布を接着剤と一緒に保持し、それらを本当にユニークにしたい装飾を追加します。
DIYの手順– Allthumbscrafts 
愛国的なヨーヨーキャンドルラップ
7月4日が近づいており、これらのキャンドルラップはアウトドアパーティーや装飾に最適です。黄麻布のストリップから簡単に作れるキャンドルラップを装飾する小さな生地Yo-Yos。ちょうどあなたが必要なサイズを選択し、それから一緒にラップを保つためにカットして、生地の接着剤を使用してください。次に、ファブリックYo-Yosで装飾します。または、他の装飾方法を選択することもできます。従来のガラスキャンドルホルダーを使用することも、独創的な方法で古いガラス瓶や瓶をリサイクルすることもできます。
DIYの手順–田園地帯
額縁の壁掛け
モノグラムはあなたの家を飾るために素晴らしいです、そしてこれはそれが本当にユニークで本当にゴージャスにする木と黄麻布で行われます。木製の文字を購入し(または、適切な道具がある場合は切り抜いて)、好きな色に塗る必要があります。フレームを入手して、古いものに合わせるか、使用してペイントします。裏地は黄麻布で、文字が浮き上がっているので、3D効果がとてもいいです。これは本当に簡単で、この夏に結婚する人を知っているなら素晴らしい結婚式の贈り物になります。
DIYの手順– Newideasforyou
バーラップファブリックボックス
これらのクラフト用品、裁縫または編み物、またはその他の便利なものを保管し、黄麻布の箱で整理してください。これらのボックスは見栄えが良いだけでなく、非常に簡単に作成できます。このプロジェクトは少し縫製が必要ですが、これは初心者にとっても簡単なプロジェクトです。あなたは箱の内側に生地を選びたいと思うでしょう、そしてそれは作成するのにほんの数時間(たぶんそれほど長くはない)かかります。これらは、バスルームの整理や雑誌ホルダーとしての使用に最適です。
DIYの手順–エコカレン
フレンチインスパイアードマガジンラック
マガジンを(浴室などに)置いておく傾向がある場合は、このマガジンラックは必需品です。作成はとても簡単で、最初から最後まで1時間もかかりません。黄麻布は折りたたまれているので、マガジンを丸めて正しい位置にスライドさせるだけです。これは好きなように飾ることができますが、フランスのデザインにとてもよく似合います。家のバスルームごとに1つ作成するか、キッチンで使用してすべての料理雑誌を保管するのは簡単です。
DIYの手順– Thegraphicsfairy
ノーソーラッフルツリースカート
クリスマスシーズンに向けて工芸品を始めるのは、決して早すぎることではありません。この美しいDIYラッフルツリースカートは、黄麻布から作られ、まったく縫製を必要としません。少し時間がかかるかもしれませんが、このスカートを下にしてあなたのツリーがどれほど豪華に見えるか想像してみてください。あなたはそれをすべて一緒に保持するためにホットグルーガンを使用し、それはフリルにも驚くほどうまくいきます。今、これらをオンラインで100ドル強で購入できますが、20ドル前後で購入できるのに、なぜそうするのでしょうか。
DIYの手順– Eevanad
黄麻布の写真の花輪
黄麻布のリースを作成する場合は、実際にカスタマイズして家族の写真を追加してみませんか?これは、母の日のために本当にユニークなものを探しているのか、自分のために作るのであれば、美しい贈り物のアイデアです。写真はコーディネートされた色のリボンで結ばれており、全体的な外観は単に豪華です。 You start with a wreath form and some wired burlap ribbon and from there, you can actually customize it just about any way you want to make it totally unique.
DIY Instructions – Thistlewoodfarms
Tufted Burlap Headboard
If you are looking to redo the bedroom, this burlap headboard is the perfect place to begin. Rustic and charming, you can actually make it in whatever size you need for your specific bed. It is really easy and the completed look is lovely. Add some burlap throw pillows and you can completely change how your bedroom looks in less than a day. It doesn’t take nearly as much material or as much time as you may think to create this look and you can embellish with burlap buttons or just anything you want.
DIY Instructions – Thestudiolo
No-Sew Burlap Bow Ties
Imagine your country wedding complete with burlap bow ties. These adorable little ties require absolutely no sewing and they are clip-ons so there are no worries of your guys being able to tie them when they are finished. These take so little time to make and very little fabric for each one so if you are planning a rustic wedding with burlap accessories, a couple of yards will go a long way in making all of the bow ties that you need.
DIY Instructions – Weddingwindow
Stamped Burlap Ornaments
Instead of using the same plain old ornaments this coming Christmas, why not spruce it up a bit by making these adorable stamped burlap ornaments? The project involves putting burlap around foam balls (which by the way are very inexpensive) and then stamping your message across them. You can display any message you want and these would also look great on wreaths or just in a bowl by the front door for added decoration.
DIY Instructions – Blissbloomblog
Stenciled Magnetic Board
Add a little style to those organization areas with an easy to make stenciled magnetic board. The stenciling makes it as elegant or whimsical as you want it to be so you could use it as an art piece which also doubles as a functional magnetic board. Just stencil in whatever pattern you want and if you want, you can add a few embellishments made from burlap like flowers, ribbons or bows. Tie a ribbon or use twine to give it a hanger.
DIY Instructions – Domestically-speaking
Burlap Project Bin
What better place to store all of those crafting supplies than in a great DIY burlap bin? This is a really easy project that won’t even take you a day to complete and once you are finished, you will have a wonderful place to store just about anything. A little burlap, some upholstery tacks and some small wooden bins (think the types that oranges come in) and you’re all set to create an attractive bin that could be used for any number of organization projects.
DIY Instructions – Gardenhouseliving
No-Sew Stenciled Burlap Pillows
Twine bows are used to hold this adorable burlap pillow together so there really is no sewing involved. It’s a great project if you have a couple of hours to spare and the time really depends on how complicated your stenciling is. If you just want a small picture or message, you can finish this up in less than an hour. The twine around the edges is a really nice touch and it gives it a great country feel and all with absolutely no sewing required.
DIY Instructions – Debbie-debbiedoos
Coffee Bag Purse
Forget paying hundreds of dollars for a Dior original. You can make this adorable coffee sack purse yourself for less than $10 – depending on the materials that you have on hand. You will need an old book for the supporting frame and then you just have to sew it all together. It’s actually a lot easier than it looks and you will end up with a bag that very strongly resembles Dior’s coffee bag purse only you’ll have a few hundred dollars left over. If you’re not a fan of the coffee bags, just use plain burlap and maybe a few stencils to get the design that you want.
DIY Instructions – Trinketsinbloom
Burlap Garland
To create a lovely burlap garland, you really don’t need anything except the wired burlap ribbon and some string for hanging. You will need something to weave the ribbon in and out of the burlap but you can use a safety pin or bobby pin for that. Then just bunch up the burlap to create a great poufy ruffled look and tie it up. You can use this for Christmas decorating or just have it on the mantel whenever you need a little extra something.
DIY Instructions – Southerndiydiary
Spring Banner Lampshade
A mason jar is the base for this adorable lamp that has a burlap covered lampshade. While you can buy a lampshade in burlap, it is a lot cheaper to just cover an old one yourself. The best part of this little lamp is the spring themed banner than runs along it. Colorful ribbons complete the look. You could also have spare banners in fall colors or in a Christmas theme so that you can change it around whenever the seasons change.
DIY Instructions – Redberrybarn
Burlap Purse with Shabby Rose Decoration
If you want a really easy sewing project and you are in the market for a new purse, this shabby rose purse is a great choice. The rose is made of burlap and in a contrasting color, it really stands out. You can complete this project in a weekend or even in a day if you are quite the seasoned sewer. It would make a wonderful gift for someone who likes things on the unique side or just make it for yourself. It has loads of room on the inside and is much easier to make than it looks.
DIY Instructions – Lamaisonreid
Barrel Shade Chandelier
While you may not be able to make this entire chandelier, you can certainly make the barrel shade that covers on it. The shade is completely covered in burlap which makes it both elegant and rustic at the same time. You may be surprised at how easy it is to create this look, which would be perfect in a foyer or formal dining room. The entire look will cost you less than $15 and take only about an hour or so to complete.
DIY Instructions – Burlapanddenim
Floral Burlap Clutch
This lovely clutch is both simple and inexpensive to make. You can do it in whatever colored burlap you have on hand or whatever you want and then create the flowers in contrasting colors to make them stand out. This is a great bag for evenings out and easy enough for teenagers to make just in case your daughter wants to create something special for prom. The shape and size of an envelope makes it perfect for times when you don’t have a lot to carry with you.
DIY Instructions – Anightowlblog
Patriotic Burlap Flag
Dress up your front door for the Fourth of July with this great patriotic burlap flag that you can make in less than an hour. You will need a bit of burlap and some blue fabric – denim works really well – as well as the cover of a hardback book to create the shape. You just create a flag with your material and then hang it with twine or another similar material. This is actually great for displaying all year and is so very easy to make, not to mention very inexpensive.
DIY Instructions – Somewhatquirkydesign
Vintage Inspired Feedbag Pillows
You don’t actually have to find vintage feedbags to have pillows that resemble them. You can easily make them yourself and dress up your bed in a great rustic way. You will need to paint the lines so that they resemble vintage feedbags and these work great with burlap. Then just sew the ends together, stuff with whatever you prefer in your pillows and seal it all up. You can also use stencils to create whimsical or vintage sayings on the pillows so that they really look authentic.
DIY Instructions – Retropolitanhip
Vintage Wire Basket
This rustic looking basket would make a wonderful hamper in your bathroom or bedroom or you could make a smaller version and use it for magazines or anything else you need. You just line the inside of the vintage wire basket with burlap and then add any decorations or adornments that you want. If you are using it for décor, just add a few burlap pillows to the top and you’re all set. You could also use it for a gift basket and fill with various other burlap type décor.
DIY Instructions – Gailsdecorativetouch
Burlap and Tin Can Vase Garland
A few up-cycled tin cans and some burlap will give you all you need to create this beautiful garland that you can actually plant flowers in. This would look great anywhere that you need to add a little color or greenery. You could use it in the kitchen for growing herbs or hang it on the porch with seasonal flowers in it. Make sure that you clean the tin cans really well and use a can opener that removes the complete top so that there are no sharp edges. Then just cover with burlap and hang with twine.
DIY Instructions – Foxhollowcottage
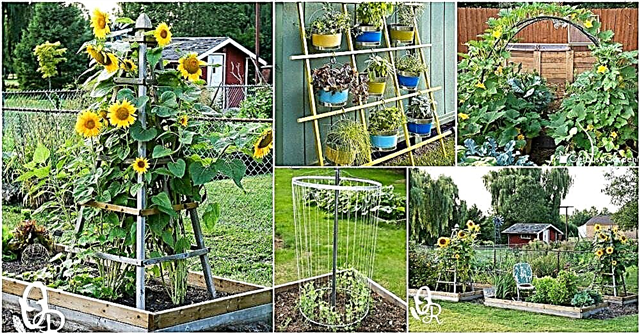
Burlap Flower Pot
These burlap flower pots are the perfect way to keep your plantings organized this spring. You can use them for flowers or even vegetables or herbs. You just cover a five gallon bucket with burlap, secure it and then label your pots however you want. Hang some twine around the bucket to hold the label in place and your plants will remain perfectly organized so you’ll always know which ones are which, even before they begin growing. This is a great idea for yards that don’t really have garden space.
DIY Instructions – Too-much-time
Burlap Fall Leaf Decorations
In just a few minutes, you can cut out multiple leaves from burlap to create gorgeous fall decorations. You merely have to trace the leaf shapes and then cut them out. If you love using mod podge, you can use that to hold your leaves onto real twigs or anything that you want to decorate for fall. String them all together and create a banner or just have multiple twigs in a glass vase and display your leaves in their natural habitat. This is a great little project that will help you along with other projects.
DIY Instructions – Foxhollowcottage
Burlap Tiki Torches
Save those empty wine bottles this spring and by summer you could have several gorgeous burlap tiki torches lighting up your outdoor living spaces. If you paint the bottles before you begin, you could have very colorful lighting or you could leave them clear – whichever way you prefer. Make a few burlap flowers to decorate them and then simply create the tiki torches which you can use on your outdoor table or affix them to poles and stick them all around your yard. Burn citronella oil in them to get a nice glow that also wards off pesky bugs.
DIY Instructions – Hometalk
Burlap Baker’s Apron
You can make this really great baker’s apron with no sewing whatsoever. You simply have to cut the burlap (you can use a burlap bag to get the writing that you want) and draw in armholes to cut out. Then just cut out the apron form and use a good fabric glue to attach the black seam. This will also keep the burlap from fraying and it looks great as a contrasting background. These would be perfect as gifts for anyone you know who loves to bake or make one for the special Dad in your life for Father’s Day – he can do all of his grilling in style.
DIY Instructions – Gailsdecorativetouch
Reupholstered Burlap Chair
Instead of throwing out that old chair that seems to be falling apart, why not reupholster it in burlap? If you don’t have an old chair to use for this project you can probably pick one up at a flea market or yard sale for really cheap. Reupholstering is much easier than you may think and when you are finished you will have a beautiful chair that looks great in any room. Add a burlap pillow and it will look even better.
DIY Instructions – Beneathmyheart
Burlap Flowered Lampshade
Take that old lamp that is in serious need of a makeover and create this beautiful flowered lampshade. You can use a new lampshade too if you want. Just create the flowers from burlap and then cut a thin strip for the top and bottom to bring it all together. You can glue the flowers and accents on with hot glue and even cover the entire lampshade if you prefer. This would be great done in different colors of burlap to really make the flowers stand out or you could just stick with a neutral color.
DIY Instructions – Laughterandgrace
Burlap Clothespin Bag
If you love drying clothes outside when the weather permits – not only do they smell wonderful but you can save a lot of energy this way – then you’ll definitely want to put together this burlap clothespin bag. It hangs right on the line so your pins are right there where you need them. You can use a burlap coffee bag that’s already put together or use fabric glue. After all, those clothespins really don’t weigh that much.
DIY Instructions – Apartmenttherapy 
Fringed Burlap Table Runner
Table runners are great for decorating and this fringed burlap runner will be a beautiful addition to your dining room table. You simply have to cut the burlap to fit the length that you need and then go through and fray the edges a bit, tying them off so that they don’t continue to fray in the future. This is a really simple project and tying the frays is actually the most time consuming part. You can easily finish this in a weekend and although there is a little sewing required, there’s not much so even if you are new to sewing, this is a great project for you.
DIY Instructions – Cottageandvine
Burlap Sunglasses Case
Keep those sunglasses safe and clean with a burlap sunglasses case that you can make yourself in just about an hour or so. This project requires a bit of sewing and you will want to choose a fabric to line the case so that your glasses don’t get scratched. You can choose whatever way you want to close the case but button closure on the front of this one works really well and is relatively easy to create. These would make great gifts so if you want something really unique for someone special, make them a burlap glasses case. They are sure to love it as much as you do.
DIY Instructions – Craftingagreenworld
Burlap Chevron Paintings
Chevron is a very popular design these days and if you want to add a bit of this design into your décor, these burlap paintings are a great way to do so. You just have to create the design on your burlap and then frame your finished result. These can be done in any color you want and they are so easy to do. Make them in whatever size you want, use whatever colors you want and you can even toggle the size of the design a bit, too.
DIY Instructions – Glueandglitter
DIY Burlap Canvas
Create a beautiful canvas for your home with burlap, a store bought canvas and whatever design or message you want to display. If you are redoing a specific room in burlap, these canvases are a must. You simply cut the burlap to cover a canvas (or several of them if you want something really large) and then paint on the message that you want to display. This is one of the easiest projects ever and it allows you to be completely creative. You could use stencils or just freehand your message to make it look really rustic and charming.
DIY Instructions – Happytogethercreates
Thanksgiving Place Cards
Ok, so you don’t have to use these only for Thanksgiving but they will look great on your holiday dinner table. These burlap place cards are very easy to make and will take very little time so even if you are planning to have several guests for dinner, you can easily make a place card for each one of them. The center is made from chalkboard paint so they are easily reusable with other guests and you can embellish them with leaves or just anything else that you feel like using.
DIY Instructions – Thecountrychiccottage
Pottery Barn Inspired Burlap Candle
If you love Pottery Barn but just can’t bring yourself to pay some of the prices there, you are going to adore this Pottery Barn knockoff candle made from burlap. You can do these in any size you want. You just have to have a candle on hand that you will cover with burlap. Mod podge holds the burlap in place and once you have the burlap on, you just paint over it with gold paint which gives it that great Pottery Barn look without the cost.
DIY Instructions – Myloveofstyle
Burlap Prints
Printing on burlap is not nearly as difficult as it sounds and once you master that craft you can create these beautiful burlap prints that can be framed or hung on their own. You could make several of these and use them as gifts. Everyone loves burlap and who wouldn’t love their own framed print in burlap? You just choose the message that you want and then print it off directly on your burlap fabric. It’s really easy to do and it allows you to create wonderful prints and gifts that will take you literally only minutes to make.
DIY Instructions – Creativetryals
Burlap Jewelry Box
An old cigar box (a wooden one) and some burlap put together create this adorable jewelry box that will be great for keeping your rings and other jewelry perfectly organized. You will need to cut the burlap so that it just fits the width of the box and then cut it long enough so that you can roll it up and stuff inside the cigar box to hold your rings and other jewelry. If you know someone who loves unique gifts, this would be a great one. You can also paint the box if you want but it looks wonderful in its natural color.
DIY Instructions – Mrkate
Bathroom Subway Art
Subway art has become very popular and what could be better than printing that subway art onto burlap. This bathroom subway art is a beautiful way to decorate the powder room and you can colored stones that you can find at your local craft store to decorate it a bit. Just print the subway art off onto your burlap, frame it and then decorate around it. It’s really simple and something that will take you literally only minutes to put together.
DIY Instructions – Domestically-speaking
Burlap Dry Erase Calendar
Keeping the family organized can be difficult. Most people have a calendar of some sort to help them to keep things together and this burlap calendar is a great choice. You can draw the calendar however you need onto the burlap and then simply frame it in a glass frame. The glass is easily written on and then erased away if you use a dry erase marker. You can be very creative and choose frames of any color and even add a few embellishments if you want. This is a great project for organizing your home and using a bit of that spare burlap as well.
DIY Instructions – Simplykierste
Burlap Storage Bins
Who doesn’t love those handy storage bins? They are after all, perfect for keeping things neatly organized and when you make them from burlap, they are just as decorative as they are functional. You will want to have a few boxes on hand to cover but you can use old diaper boxes or anything that is the size that you need. After all, you will be covering them completely with burlap so it doesn’t really matter what they were in a previous life. Once you finish, you can use these to organize virtually every room in the house. They are easy to make and if you have burlap and boxes, they may not cost you anything, either.
DIY Instructions – Blissfulkeeperathome
Burlap Table Bouquet
If you are planning a burlap wedding, these little table bouquets will be perfect for decorating your reception. If you aren’t currently planning a wedding, you can still make these and just use them to decorate around the house. They are simply folded burlap with ribbon tied around to keep them in place and then filled with lovely flowers. You can use whatever flowers you want or decorate them a bit of you want. You can literally make these in about ten minutes each so if you are planning a wedding, this is a really quick way to get those tables decorated.
DIY Instructions – Propcloset
Burlap Wine Bags
If you love giving wine as gifts, try making these great burlap wine bags to hold that wine. Each bag takes only about half an hour and you can decorate them however you want. Use stencils to put messages on the fronts or even add burlap flowers or bows. These are very easy to make and take very little material so a yard or two of burlap will make several of them. Just tie the top up with ribbon or use twine to really make the bag look rustic.
DIY Instructions – Michaels
Recycled Patron Vase in Burlap
Patron bottle vases are elegant and adorable and you can really dress them up with a little burlap. Just cover the vase in lace and then cover the center of the lace with burlap or you could do this vice-versa and put the burlap as the backing. These are great for decorating for parties because they are inexpensive and very easy to make so if you need several, they won’t take days to make or cost you a fortune. Add a flower to each one and you’re all set.
DIY Instructions – Diyinspired
Burlap Wedding Invitations
If you are planning a wedding that uses a lot of burlap, why not incorporate the look into your invitations? With some card stock, a printer and a little burlap you can create beautiful invitations that are sure to be a huge hit with family and friends. These are also great for summer parties and other special occasions when you need to send out invitations. You could also use them as wedding programs to let everyone know who is in the wedding and the venue that you will be following.
DIY Instructions – Intimateweddings
Burlap Boutonniere
Whether you are planning a burlap wedding or you have a special someone going to the prom, these burlap boutonnieres are a great choice. You can cut the form out of an empty cereal box so if you already have the burlap and a few other supplies on hand, you won’t have to spend anything to make these. You could add baby’s breath or other flowers to them and actually customize them to perfectly match any wedding theme. And, they’re a lot cheaper than boutonnieres that you purchase from the florist.
DIY Instructions – Greenweddingshoes
Burlap Door Hanger
Whether your family is filled with football fans, baseball enthusiasts or any other sport, you can create a wonderful door hanger that suits your family perfectly. This burlap door hanger is really easy to create and can be completely customized to fit your family’s favorite sport and favorite team. You just have to cut the burlap to match the form that you need (football, baseball, etc.) and then sew it together and stuff. Once you’re done you can decorate with bows or just anything that makes it special.
DIY Instructions – Greatdaygraphics
Burlap Covered Gifts in a Jar
You know how popular gifts in a jar are. Well, this is a burlap twist on those popular gifts. When decorating your jars, add burlap to the top and then some twine or jute rope for tying. You can use smaller jars and give them away as party gifts or create larger ones and use as gifts for special occasions. The burlap really gives the jars a homey look and you can fill them with your favorite recipes or even jellies, jams or any other yummy goodness.
DIY Instructions – Tinyprints 
Burlap and Mason Jar Storage
Old mason jars and some burlap work really well together in creating this wonderful storage shelf that you can use in bathrooms, kitchens or anywhere you need it. You simply cover a piece of wood with burlap and then affix your jars, which will need to be secured with clamps. These are great for holding Q-tips and cotton balls in the bathroom or you could use them in the kitchen for housing your wooden spoons. The entire project takes less than an hour and gives you a beautiful storage solution.
DIY Instructions – Putitinajar
Burlap Owl Wall Hanging
The kids are going to love helping you to create this whimsical owl from burlap. You need burlap, felt and a few craft supplies and then you can hang your little owl on his own tree branch. Frame it and you have a beautiful wall hanging that is sure to bring a smile to everyone who sees it. This project does not require any sewing. You can glue everything together with a hot glue gun and it’s so easy that you may end up adding more than one owl to your little tree.
DIY Instructions – Urbanhoot
Burlap Picture Matting
If you really want your pictures to stand out when you hang them, replace the matting behind them with burlap. This is a great way to make your entire photo display look rustic. You can purchase frames at the Dollar Store for around a dollar each and then make them really special by adding the burlap and some scrapbooking paper to create a unique mat for each picture. You don’t have to sew or even glue for this one. Just add the burlap and then the picture and the glass from the frame will keep it all in place.
DIY Instructions – Twostorycottage
DIY Burlap Advent Calendar
You can create a beautiful Advent calendar using burlap or you could turn this into a Christmas countdown calendar if you wanted. Actually, you could use it as a normal calendar if you want, just be sure to add a label for each month. If you are making and Advent calendar, you can fill the numbered pockets with small candies or gifts or use plain labels instead of pocketed ones to create a regular calendar. Either way, this is a really easy project and one that won’t cost much, either.
DIY Instructions – Onsuttonplace
Burlap Christmas Trees
These beautiful burlap Christmas trees are inspired by Pottery Barn but they cost much less. You can do these in alternating colors or alternate the burlap with canvas to make them a bit unique. You can make them as tall or short as you want, depending on the size of the cones that you use and you can make them fuller by simply adding more fabric. Once you’re finished, decorate if you want or just leave them plain. There is no sewing required so this is a project that everyone can do and the kids will love to help with it.
DIY Instructions – Myhappynest
Burlap Boot Stuffers
Ok, so this is not technically a décor project but it’s a very helpful one anyway. These burlap boot stuffers are great because they are quick and really inexpensive to create and they work perfectly for keeping your boots from drooping. Two boot stuffers takes only a yard of burlap to create so you can make several of these if you have more than one pair of boots. These are also great for gifts and there is very little sewing required.
DIY Instructions – Shinewithjl