私たちは春の真ん中にいます。花、野菜、ハーブなどを植えるのに最適な時期です!ガーデニングシーズンが近づいてきて、本格的に進んでいます。ガーデニングが初めての方でも、ベテランのグリーンサムをお持ちの方でも、ガーデニングは屋外でより多くの時間を過ごすためのやりがいのある方法であり、屋内のスペースを最大限に活用します。ガーデニングは楽しいですが、非常に難しいこともあります。多くの植物が繁栄するためには微妙なバランスのとれた状態が必要なので、それは微妙な芸術と科学です。これらのガーデニングのヒントとコツは簡単で手頃な価格であり、今年最高の結果を得るのに役立ちます!
古いソーダボトルを使ってドリップフィーダーを作ります。
 水分が頭上からではなく根元に届くと、植物(特に野菜)の方が効果的ですか?あなたの植物の隣に地下に置くことができるドリップフィーダーを作るための1つの安価で簡単な方法は、古いプラスチックソーダボトルを使用することです。ちょうどそこにいくつかの穴をあけて(バーベキューの串は素晴らしい働きをします)、そしてそれを若い植物の隣に植えます。ボトルは根の近くの水のゆっくりとした放出を可能にします。この方法は、真菌を防ぎ、葉の問題も減らします。詳しい情報については、ソースをご覧ください。後ほど、このアイデアに似ていて、他のアプリケーションに最適なアイデアをいくつか紹介します。
DIYの手順とプロジェクトのクレジット:Thegardeningcook
ポットインポット。
 ポットインポットの方法は、園芸問題の多くを解決するために使用できる方法です。フロリダフレンドリープラントに関するこのページには、それを検討する20の異なる理由が記載されています。柔軟なガーデニングに最適です(植物をほとんど動揺させることなく、物事を簡単に移動できます。光の条件などで実験している場合は素晴らしいです)。また、庭に砂、サンゴの岩、または根が侵入している場合にも最適です。 。それらは、それを試すほんのいくつかの理由です。上にリンクされているページをチェックして開始してから、この更新された投稿をご覧ください。ポットインポットの方法についてさらに学ぶことができます。これは本当に、今まで見た中で最もシンプルで独創的な園芸のアイデアの1つです。
DIYの説明とプロジェクトクレジット:Floridafriendlyplants
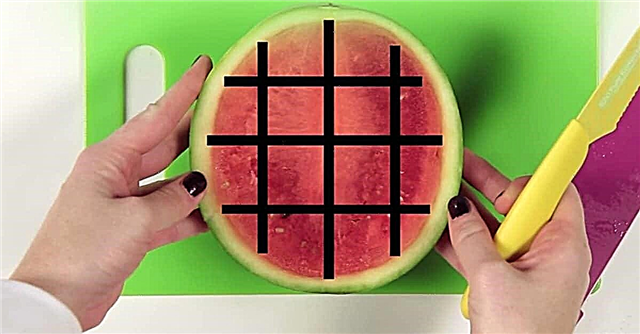
トマトに正しい方法で水をやります。
 トマトは乾燥した気候で生育するのが難しい場合があり、頭上スプリンクラーでトマトに水をまくことが必ずしも葉に適しているとは限りません。ソリューション?信じられないかもしれませんが、本当に必要なのは、いくつかの穴が開けられたゴミ箱と、堆肥でいっぱいになったシャベルです。こちらの写真と方法をチェックして、自分で試してみてください。それらのトマト植物はすばらしく見えます。素晴らしい結果!
DIYの手順とプロジェクトのクレジット:Hometalk.com
バラを挿し木で繁殖させ、ジャガイモでバラを育てます。
 バラを育てる最も簡単な方法の1つは、挿し木を取ることです。このページでは、基本と、ジャガイモのバラを含むクールで非常に奇妙なトリックについて説明します。そうです、じゃがいもでバラを育てることができます。バラの挿し木をジャガイモに突き刺し、両方を地面に押し込みます。ジャガイモは根が発達している間、挿し木を湿った状態に保ちます。
DIYの手順とプロジェクトのクレジット:アマチュアガーデニング
成形コンクリートプランターを作る。
 コンクリートブロックが以前から庭を上げたのを覚えていますか?ここに別の同様のアイデアがありますが、今回だけ、あなたはゼロから始めています!そうです、コンクリートブロックではなく、コンクリートだけです。これは非常にクールでクリエイティブなプロジェクトで、プラスチックの容器を型として使用して、コンクリートプランターをゼロから作成します。完成した結果は素晴らしいです!縁が少し荒れているのが大好きです。それらは、あなたが千年後の考古学の発掘現場で見つけるもののように見えます。
DIYの説明とプロジェクトのクレジット:ラドメガン
自家製の庭の石。
 園芸店では、可愛らしい塗装が施された川の岩に格言が書かれているのを見たことがあるでしょう。さらに良いことは何ですか?自分でペイントした庭の石。必要なのは、平らにした川の岩とペイントとマーカーだけです。このアイデアの優れている点は、植えたものの名前を含め、何でも書けることです。これは、一目で植物を特定することにまだ慣れていない場合、または植物がまだ発芽しておらず、どこに何があるかわからない場合に最適です。
DIYの手順とプロジェクトのクレジット:Diyncrafts
ペットボトルの水タンク。
 これは以前のスロードリップボトルに似ています。ペットボトルを手に入れ、底を切り取り、使用しているプランターと同じ高さであることを確認します。新しい芽を植える前に土に押し込み、暑い日にボトルに水を入れます。ゆっくりと水に垂れ、根に直行します。これは植物の成長に非常に役立ちます。ウォーターボトルのリザーバーを最大限に活用するためのヒントやコツについては、必ずソース記事をチェックしてください。
DIYの手順とプロジェクトのクレジット:Dabbletree
卵殻であなたの植物に栄養を与え、保護してください。
 次回、デビルドエッグを作るときは、ゴミ箱の殻を投げ捨てないでください!卵の殻は庭で役立ちます。植物の土台の周りに広げると、カルシウムで土壌を養うことができます。その上、卵殻は実際に特定の昆虫を撃退するため、害虫から植物を保護します。とてもかっこいい。
DIYの説明とプロジェクトのクレジット:Thechicsite
壊れた鉢を植物マーカーに転用します。
 以前の川の岩のように、これは植物の位置をマークするためのもう1つのアイデアです。無駄になってしまう素材を上手に利用するのはキュートな発想です。さらに、忠実なポットが壊れるのは悲しいことであり、この方法であなたはそれをあなたの庭の一部として保つことができます。私がこれに追加する唯一の注意は、壊れたエッジが鋭利であることです。子供が走り回っている場合、これはおそらくあなたの庭に望まれるものではありません。
DIYの説明とプロジェクトクレジット:Wikihow
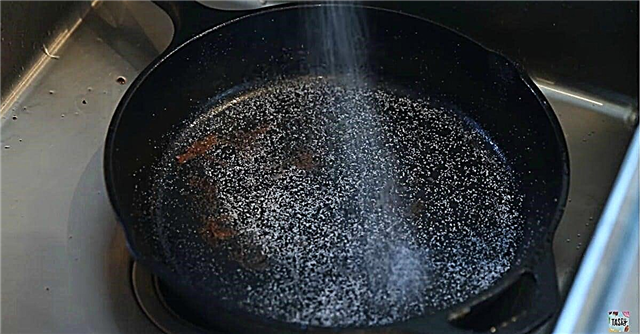
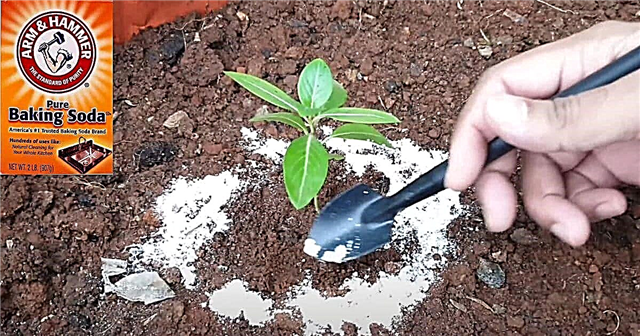
重曹を使って甘いトマトを育てます。
 彼らは通常あなたがスーパーで買うものよりもはるかにジューシーで甘いので、多くの人々がトマトを育てるのが大好きです。どうすればもっと甘くておいしいですか?重曹を土に加えてみてください。植物ではなく土壌にのみ散布してください。重曹はベースであり、トマトの酸味を打ち消します。結果?甘いトマト。
DIYの手順とプロジェクトのクレジット:Thegardeningcook
柑橘類の皮に苗を植えます。
 この植栽方法は、My Roman Apartmentの作者によって発見されました。ブログの所有者は、1暦年は何も新しいものを購入しないことを誓っていましたが、新しい苗木を植える場所に行き詰まりました。結局のところ、鉢植えの土を入れたくぼみのある柑橘類の皮で苗をうまく育てることができます。柑橘類の皮を植えるよりも、地面に苗を植える準備ができたら、堆肥の山の皮を捨てることは良い考えです。どうして?あなたは土壌にあまりにも多くの酸性度のリーチングを望まない。
DIYの手順とプロジェクトのクレジット:Myromanapartment
イチゴの塔を建てます。
 おいしいジューシーなイチゴをたくさん栽培し、その過程でスペースを節約したい場合は、ストロベリータワーが最適です。ただし、このセットアップで本当にエキサイティングなのは、タワー全体に徐々に水を滴下できることです。トップポットに水筒があります(前に読んだのと同じです)。水は上の鍋から下のすべてのものに流れ落ちます。
DIYの手順とプロジェクトのクレジット:Apieceofrainbow
あなた自身の石畳を作ります。
 玉石はどこに置いても本当に魅力的な効果をもたらします。彼らはパティオを構築するため、またはあなたの庭を通るパスを作成するために最適です。計画が何であれ、この簡単なチュートリアルでは、最初からそれを行う方法を示します。写真ははっきりしていて、簡単にフォローできます。実際、このプロジェクト全体は、私が想像していたよりもずっと単純です。あなたの庭に昔ながらの魅力を加えるのがとても簡単だと誰が思ったでしょうか?
DIYの手順とプロジェクトのクレジット:Tancamjenksfam
リサイクルされた材料でかわいい庭の生き物を作ります。
 このページには、リサイクルされた材料を使って、愛らしい庭の生き物を作るためのエキサイティングなプロジェクトがたくさんあります!私はそのハリネズミが大好きです。彼はペットボトルでできており、何本かのひもが付いていて、かわいい目が2つあります。彼はプランターを兼ねており、植物が毛皮の代わりになっています。オンドリがペットボトルとして始まった、またはそれらの蝶が同じように最初のタイプのボトルとして始まったとは信じがたいです。これらのプロジェクトのどれが一番かわいいと言えるでしょうか!彼らはすべて信じられないほどです!
DIYの手順とプロジェクトのクレジット:Diygardendecor
PVCパイプからトレリスを構築します。
 あなたの庭にトレリスを追加したいと思ったことはありますか?意外と簡単な設計の1つは、一緒にリンクされたPVCパイプを使用しています。これらの美しい写真をチェックしてください。このトレリスはキュウリの栽培に使用されていますが、その上にいくつでも栽培できます。それは見栄えがよく、うまくいきます。
DIYの説明とプロジェクトクレジット:Pvcplans
蚊取りハーブ。
 蚊はあなたの庭やあなたのデッキであなたを悩ませていますか?キャットニップ、レモングラスなど、自然にそれらをはじくハーブはたくさんあります。あなたの庭にこれらの一つ以上を一緒に植えてください、そうすればそれらの虫を素早く追い払うでしょう。それらをポットに入れ、パティオまたはデッキで育てれば、時間をかけたい場所から遠ざけることができます。おまけとして、これらのハーブはすべて他の目的に役立つので、食べ物などのために収穫することができます。これはどこでも蚊よけをスプレーするよりはるかに健康的な代替手段です。それはあなたの庭にとってもあなたにとっても良いことです。
DIYの手順とプロジェクトのクレジット:Salisburygreenhouse
レモンバームが素晴らしい理由を学びましょう。
 あなたの庭で育つ新しいハーブを考えてみませんか?レモンバームの栽培について考えてみてください。アンの資格のある生命によると、レモンバームはあなたが育てることができる最もオールラウンドな役立つハーブの一つです!蚊の忌避剤として働き、ミツバチを引き寄せて花を受粉するのにも役立ちます。その上、それは多くの薬効がある用途を持ち、様々なレシピでうまくいきます。ポプリやアロマセラピーにも最適です。信じられないかもしれませんが、コンディショナーやフェイシャルに優れています。基本的に、それはあなたの人生のあらゆる領域とあなたの家のあらゆる領域で役に立ちます。
DIYの手順とプロジェクトのクレジット:Annsentitledlife
蚊を撃退するより多くの植物。
 前に、ハーブを使って蚊を撃退する方法について話しました。これらの厄介な昆虫を追い払うより有用な植物を学びたい場合は、こちらをご覧ください。すべての植物のその他の利点と、それらを他に何に使用できるかを学びます。これは素晴らしいガイドです。
DIYの手順とプロジェクトのクレジット:Naturallivingideas
庭の水を簡単な方法で集めます。
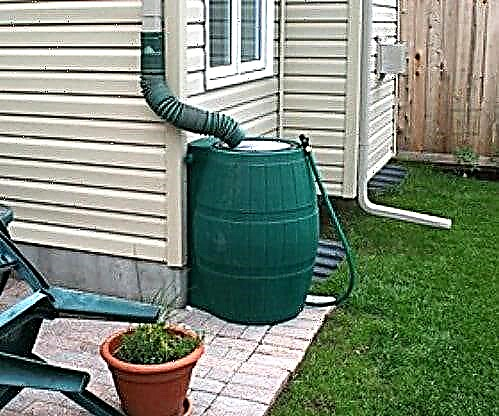 水道料金が高い場所に住んでいますか?ガーデニングのコストを削減する1つの方法は、空から落ちる水を利用することです。乾いた日に植物に水をやる必要があるなら、自然の降水量を利用するためにレインバレルをセットアップしてみませんか?水が落ちたら集めて、必要なときに使いましょう。これはセットアップが簡単なシステムで、公共料金の支払いに最適です。
DIYの手順とプロジェクトのクレジット:Fivecentnickel 写真提供 madmack66。
シードスターターとしてKカップを使用します。
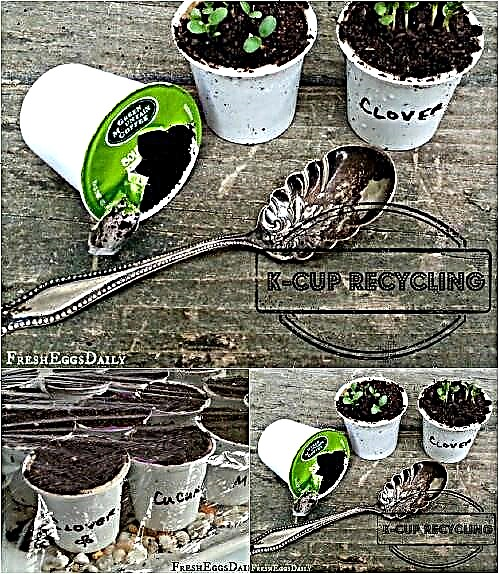 Kカップを使用する必要があるコーヒーメーカーはありますか?あなたの庭でそれらをうまく利用しない限り、それらすべてのK-Cupはたくさんのゴミに追加されます。それは彼らが種スターターに最適なサイズであることがわかりました。それらにラベルを付けて種子を追加し、それらが発芽するのを待ちます。
DIYの指示とプロジェクトクレジット:Fresheggsdaily
ワインのコルク植物マーカー。
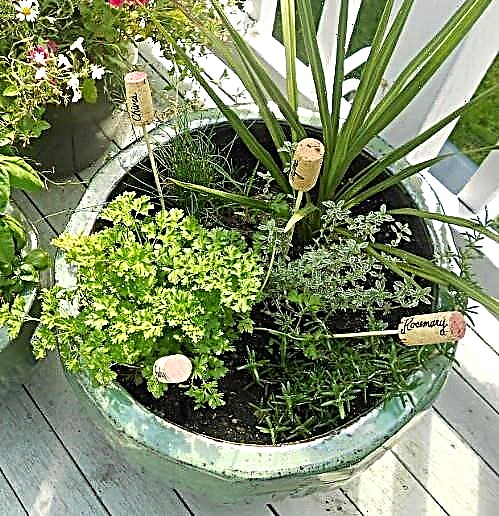 そこに植物マーカーのための非常に多くのクールなアイデアがあります!川の岩と壊れた鍋はとてもかわいくて独創的ですが、熱心なワイン愛好家向けのワインコルクがここにあります。飲むワインのコルクを残してマーカーで書いて、写真のように土に釘付けにします。これはとてもかわいい、そして庭への素晴らしいパーソナライズタッチです!
DIYの手順とプロジェクトクレジット:Shineyourlightblog
ペットボトルを自給式シードスターターに変えましょう。
 古いプラスチックソーダボトルを使って植物に水をやる方法について話をしましたが、それらを自分自身に水を供給する種スターターに変えることもできることを知っていましたか?これは、いくつかの科学原理を教えるクールなプロジェクトなので、子供たちと一緒に行うのに最適です。ペットボトルを半分に切り、上半分を上下逆さまにして下半分の中に入れます。湿気は下部チャンバーで凝縮します。ボトルのキャップに開けた穴に糸を当てると、水分が上向きになります。これは、屋内でガーデニングプロジェクトを開始する楽しい方法です。
DIYの手順とプロジェクトのクレジット:Diyncrafts
重い屋外の植木鉢の重量を減らします。
 それが一杯になると移動しようとするのに後退している超重い巨大な屋外の植木鉢の1つがありますか?将来、これらの屋外植物の重量を減らす簡単な方法の1つは、発泡ピーナッツで底部を埋め、その上に土を置くことです。これにより、重量が大幅に軽減され、実際に土壌の排水が改善されます。なんてクールなの?おそらくより頻繁に植物に水をやる必要があることを覚えておいてください。
DIYの説明とプロジェクトのクレジット:Familyhandyman
ミニ温室としてプラスチック箱を使用してください。
 透明なプラスチック製のゴミ箱は、ほぼすべてに最適です。結局のところ、彼らの多くのアプリケーションの1つはガーデニングにあります。これらのビンは、苗を育てるミニ温室として美しく機能します!それらは安価で用途が広く、オフシーズンに他のアプリケーションを使用できるため、これは初心者にとって最高のガーデニングのヒントとコツの1つです。
DIYの手順とプロジェクトのクレジット:プレーリーコテージローズ
ナメクジを殺すためのさまざまな方法を学びます。
 ナメクジがあなたの庭の主要な害虫問題である場合、ここでそれらを殺すためのさまざまな異なる方法を学ぶことができます。彼らは実質的に何でも食べるので、ほとんどの庭師はナメクジのファンではありません。彼らを殺すために急ぐ前に、しかし、彼らの生態学的な利点について読んでください。ナメクジは必ずしも悪いわけではなく、数が少ない場合はそのままにしておくことをお勧めします。彼らは死んだ物質を食べ、植物の繁殖を助ける種をまき、窒素のリサイクルを助けます。
DIYの手順とプロジェクトのクレジット:Thisgardenisillegal
このチュートリアルでトマトに力を入れてください。
 野菜のガーデニングのヒントをお探しですか?この人気 YouTubeビデオ あなたのトマトのためのスーパースターター肥料を作成する方法を教えます。材料はすべて一般的で手頃な価格です。完成した肥料ミックスの合計コストについて不満を言うコメント者がいることに気づくでしょうが、これはトマトのバルク肥料のバルクバッチであることを覚えておいてください。あなたが実際のトマト農場を持っているなら、これは理にかなっていて、それがあなたが良い作物を生産するのを助けるならあなたにお金を節約するかもしれません。そうでない場合は、より小さなバッチを作成してください!これはあなたにお金を節約します!
便利なインフォグラフィックで堆肥について知っておくべきことをすべて学びましょう。
 堆肥化しますか?そうしないと、このインフォグラフィックはあなたの心を変えるでしょう。ご覧のとおり、1立方ヤードの堆肥の推定価値は562ドルです。それはあなたが肥料、有機物、植物の成長ホルモン、および他の園芸用品のためにあなたがそれなしで支払うものです。また、自分の庭をはるかに超える堆肥を使用する環境の驚くべき利点についても学びます。堆肥箱に材料を重ねる最適な方法を見つけ、最後に、堆肥化できることとできないことを教えるクイックガイドを入手します。これは初心者のための信じられないほどのリソースです!
DIYの説明とプロジェクトクレジット:修正
種子がまだ植えるのに良いかどうかを調べます。
 植えようとしている古い種子が周りに横たわっている場合、それらを成長させるつもりでなければ、多くの時間を無駄にしたくないでしょう。時間を無駄にしていないことを確認する簡単な方法の1つは、湿ったペーパータオルを使用することです。湿ったペーパータオルを暖かい場所、たとえば衣類乾燥機の上に置きます。いくつかの種を上に置き、次の数日間で何が起こるかを確認します。発芽が見られた場合は、バッチを植えてください!そうでない場合、ウィンドウはおそらく通過しています。これは素晴らしい時間節約であり、コスト節約にもなります。どの種子がまだ良いのか驚くかもしれません—何年も続くものもあります!
DIYの手順とプロジェクトのクレジット:Food52
あなたの庭に石を彫刻します。
 以前にあなたと共有した塗装された川の岩を覚えていますか?石に書き込むもう1つの優れた方法は、石に直接彫刻することです。これらの愛らしい家族の岩を見てください(かわいいしゃれも!)。あなたはあなたの庭の岩の上に何かを刻むことができ、それらを植物のマーカーとして使うことさえできました。
DIYの説明とプロジェクトクレジット:Serenityhealth
苗のスターター用トイレットペーパーロールを転用します。
 これらは素晴らしいです!誰もが自分の家にトイレットペーパーのロールを持っています。空のロールを捨てるのではなく、積み上げていくと、スターターの苗に最適な素材ができます。いくつかの切り込みを入れ、下部を折り曲げてテーピングするだけの簡単なことのようです。ぴったりサイズです!
プロジェクトクレジット:ステイシー
この驚くべき野菜栽培のチートシートをチェックしてください。
 この驚くべきインフォグラフィックは、すぐに野菜栽培を始めるのに役立ちます!プロットガーデンで育てるのに最適な野菜と、パティオガーデンに最適な野菜を見つけます。下にスクロールすると、野菜を脅かす一般的な害虫や、特定の野菜を育てるヒントについて学びます。播種に直射日光が必要な植物、必要な間隔、発芽して成熟するまでにかかる時間などを調べます。また、種をまき、野菜を収穫する適切な時期を学びます。最後に、コンパニオンプランティングのガイドでは、スペースを最大限に活用して害虫を防ぐためにどの植物を一緒に配置するかを説明します。
DIYの手順とプロジェクトのクレジット:Anglianhome
箸で植物にラベルを付けます。
 これは、植物にラベルを付けるための迅速、簡単、そして安価な方法です。次回中国料理のテイクアウトに出かけるときは、安いお箸を捨てないでください。代わりに、洗い流して保存してください。あなたはそれらに種子の包みを付け、それらをそれぞれの植物の隣の土に貼り付けることができます。それは本当にそれより簡単なことはありません。
DIYの手順とプロジェクトのクレジット:Thisoldhouse
パレットをプランターに変えます。
 パレットは素晴らしいものです。あなたは家や庭の至る所でそれらを百の目的のために使うことができます。美しくて便利な、それらを再利用できる1つの方法は、それらを庭のプランターにすることです!これは非常に簡単なプロジェクトで、非常に安価です。それについてもう一つの素晴らしいことは、それがスペースを節約するために素晴らしいことです。縦型のデザインはどんな場所にも最適です。あなたが庭を造ることができる非常に小さな庭やパティオエリアがあっても、あなたはこの方法で多数の植物を育てることができます。
DIYの手順とプロジェクトのクレジット:Diyncrafts
壊れた鍋を使って素晴らしい妖精の庭を作りましょう。
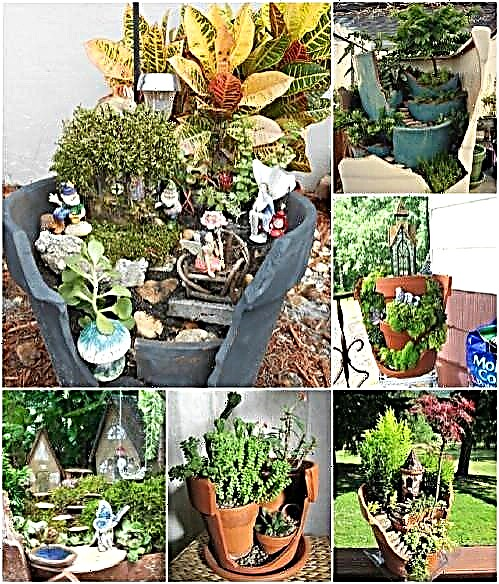 あなたがあなたの庭に置くために買うことができるそれらの小さな妖精の家を知っていますか?ポットで素晴らしい妖精の庭を作りたいなら、壊れたものから始めてください。このリンクでは、その方法を正確に確認できます。側面の大きな破片を折って、壊れた鍋に土を少し入れ、中に少し角度をつけてから、セラミックの小さなチップを埋めて追加します(たとえば、同じ鍋または別の鍋から)階段を作る。次に、植物や妖精の家など、好きなものを心に追加します。そのページには、あなたができることの信じられないほどの例がたくさんあります!ご覧のとおり、このテーマには多くのバリエーションがあります。アイデアは、テラスのセットを作成し、それらを魔法のようなものに変えることです。
DIYの手順とプロジェクトのクレジット:Boredpanda
バラを発根させるための完璧なDIYガーデニングテクニック
世界中のほぼすべての人がバラを愛しており、あなたの家の周りにそれらを置くことは彼らの美しさと素晴らしい香りを楽しむための素晴らしい方法です。
それらを植えることは難しい必要はありません。実際、これらのバラを発根させるための本当に簡単なDIYテクニックがあり、植物から挿し木を取り、自分で育て始めることができます。複数のバラの茂みがある場合、これはそれらを少し広げるのに最適な方法です。
プラスチックの水差し、2リットルのソーダ瓶、発根ホルモン、ナイフと剪定鋏、および小さな鉢植えの土が必要です。
Hartwood Rosesはステップバイステップで提供し、それは非常に簡単なので、常にバラが欲しかった場合、これはそれらを入手するための素晴らしい方法です。このテクニックを使用して、庭全体に植えるためのバラの根を張り始めます。
DIYの説明とプロジェクトクレジット:hartwoodroses
ペットボトルから水スプリンクラーを作る。
 これは、庭の古いペットボトルのもう1つの用途です。画鋲でボトルの長さの周りに穴の線を作り、回転させて、数回繰り返します。ホースを内側に押し込み、テープを貼って接続を密閉し、水を入れます。を見て詳細をご覧ください ビデオ LifeHackerで。
素晴らしいDIYの鳥の餌箱。
 家の周りにすでにあると思われるものを使って、独自のバードフィーダーを作るのは簡単だと知っていましたか?ここでは、あなたがチェックできるようにたくさんの美しく創造的な例を集めました。ティーカップと受け皿のある最初のものが大好きです。とってもキュートで、ちょっとした色合いも。他のバードフィーダーは、ティーカップ、ケトル、靴などで作られています!これらのいくつかは、巣箱のアイデアとしても機能します。
DIYの手順とプロジェクトのクレジット:Diyncrafts
古いホイールをゴージャスなモザイクプランターに変身させます。
 このプロジェクトの変革は驚くべきものです。左側を見ると、このエレガントなモザイクプランターが古いホイールとしてどのように始まったのかがわかります。プロジェクトのタイトルと主題がなければ、私はおそらく関係を作っていなかったでしょうし、プランターが車輪から作られていることに気づきました!見た目は全然違います。芸術的志向のある庭師にとって完璧な素晴らしいプロジェクトです。クールなのは、ホイールは実際には単なる船としての機能を超えた機能的な目的を持っているということです。車輪は完全な排水を提供します!
DIYの説明とプロジェクトクレジット:Plantcaretoday
古いジーンズをガーデンエプロンに変えます。
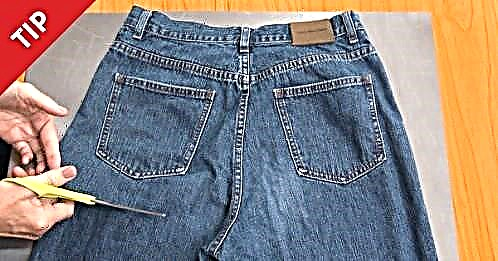 土にひざまずいている間、あなたの服をきれいに保つ庭で使い古していたものはありませんか?古いジーンズのペアが横になっている場合は、はさみを使用するだけで、数秒でガーデンエプロンに変えることができます。ビデオをチェックしてください。時間とお金を節約する方法はなんと!
DIYの手順とプロジェクトのクレジット:Diyncrafts
あなたの庭にハチドリを引き付けます。
 ハチドリは華やかで、花から花へとホバリングして飛び回るのを見るのはとても楽しいですが、とらえどころのない生き物になることもあります。ハチドリの餌箱を購入することもできますが、多くの庭師はハチドリの餌がアリ(主に砂糖でできている)を引き寄せるという単純な理由で嫌いです。ハチドリを庭に引き寄せる別の方法があります。ハチドリを魅了する花を植えるだけ!このリンクは、15の素晴らしいオプションを提供します。これらもすべて美しい植物で、あなたの庭を彩ります!
DIYの手順とプロジェクトのクレジット:Hgtvgardens
プランターを美しくします。
 まだ有用であるが、見ていてそれほど楽しいものではない古いプランターがありますか? Sweet Escapeのこのプロジェクトは、プランターを美しいものに変えるための楽しく、素早く、簡単な方法です。単色でスプレーペイントするだけではなく(それ自体は悪い考えではありません)、このプロジェクトでは、単純なパターンと複数の色を各プランターに適用できます。最終結果は素晴らしいです。メタリックペイントは、本物の輝きと輝きを加えます。
DIYの手順とプロジェクトのクレジット:Thesweetescape
コーヒーフィルターでプランターから漏れて、あらゆる場所で汚れがつくのを防ぎます。
 プランターを持ち上げて移動するときに嫌いではありません。底から土が漏れるだけです。リークをキャッチするトレイがある場合でも、面倒なプロセスになる可能性があります。観葉植物の排水に影響を与えずにこれを停止できる1つの方法は、各ポットの底にコーヒーフィルターを追加することです。これは主に、根系が高度に発達していない若い植物の問題です。古いコーヒーフィルターを使用できます。新しいフィルターを探す必要はありません。それらは生分解しますが、植物の根が成長を終え、土壌がそれほど漏れないため、通常、それらを交換する必要はありません。
DIYの手順とプロジェクトのクレジット:Thisoldhouse
ワインボトルで簡単に水やりハック。
 プランターに触れると水が蒸発する暑い時期に、庭に水をやり、土壌を湿らせておく簡単な方法をお探しですか?ここにすばやく簡単なハックがあります。空のワインボトルまたはビールボトルをつかみ、水で満たし、上下を逆にして、プランターの内側にすばやくジャムします。水はボトルから土壌にゆっくり移ります。それはあなたに水やりの日を節約できます。こちらでビデオをご覧ください。
出典:Thegreenists Youtube
セメントブロックの束を高くした庭のベッドに変えます。
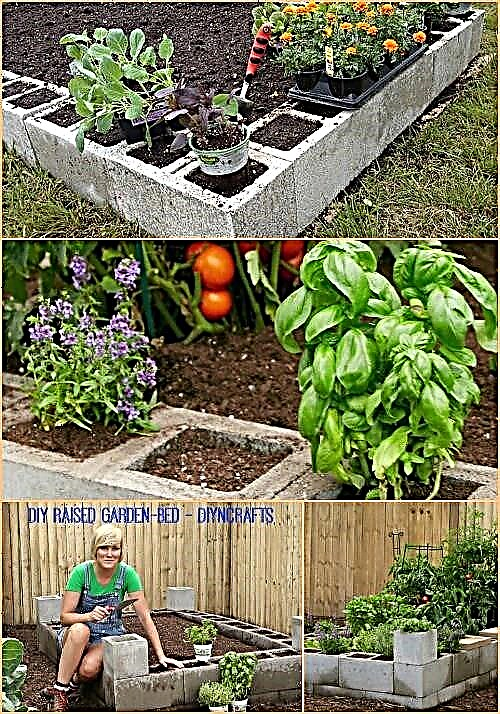 上げられた庭のベッドは素晴らしいです。それらは見栄えがよく、背中の問題があり、植物の世話をするために遠くに曲がる必要がない場合は、扱いやすくなります。 1つを作成する1つの簡単な方法は、セメントブロックの束を使用することです。これは平方フィートのガーデニングにも最適です。各ブロックは基本的に既にプランターとして機能しており、必要なものは何でも中央に配置できます。
DIYの手順とプロジェクトのクレジット:Diyncrafts
ハンギングポケットオーガナイザーを垂直の庭に変えます。
 このアイデアは天才です!これは吊り下げポケットオーガナイザーで、クローゼットのドアの内側に取り付けて靴を保管できるのと同じ種類です。主催店で安く購入でき、外に吊るして各ポケットを植物用に使えます。これは、地面の植物を邪魔したい猫や他の害虫に対する優れた抑止力であるだけでなく、スペースを節約するための素晴らしい手法であり、小さなアパートのバルコニーにハーブや花の庭を持ちたい場合に最適です。
DIYの指示とプロジェクトクレジット:指示書
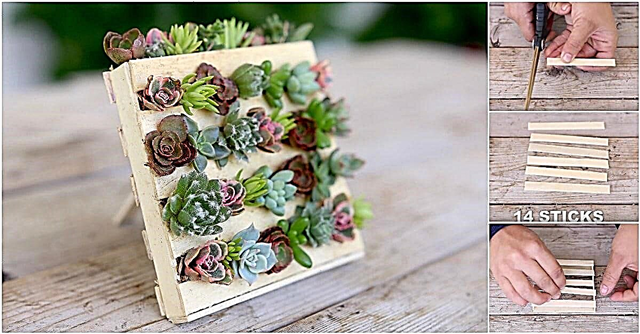
葉から多肉植物を繁殖させる。
 多肉植物は、自分の葉から発芽できる植物の中にあります。したがって、家に多肉植物がある場合は、すでに所有している葉の切り抜きを使用して、実際に多肉植物を育てることができます。 Succulents&Sunshineがステップバイステップの手順を教えます。砂漠の庭を育てるのに最適な方法です。
DIYの手順とプロジェクトのクレジット:Succulentsandsunshine
日陰で育てることができるものを見つけてください。
 あなたの庭の光の欠如に不満を感じていますか?あなたが植えたものすべてが枯れて死ぬのですか、それともそもそも成長を拒否するだけですか?その問題を回避し、これらの15の耐陰野菜である日陰のスペースを最大限に活用してください。それらのすべては、1日4時間以下の日光を必要とします!
DIYの手順とプロジェクトのクレジット:Motherearthnews
植木鉢から噴水を作ります。
 庭に小さな噴水があり、周囲の騒音を発生させることができたら、すばらしいと思いませんか?もう不要な古いプランターがありますか?いくつかの異なるサイズでそれらを使用していて、それらを捨てたくない場合は、このチュートリアルを使用して、それらを小さな噴水に変換できます。必要な消耗品はかなり少なく、結果は非常に良く、メンテナンスも簡単です。そして、噴水を買いに行くよりも確かに安上がりです。このプロジェクトは簡単にカスタマイズできます。
DIYの手順とプロジェクトのクレジット:Interiorfrugalista
ネギの継続的な供給を作成します。
 このプロジェクトでは、首を切り落とし、側面に穴を開けるペットボトルが必要です。球根がまだ小さいときは、玉ねぎの球根を穴から差し込み、ボトルを土で満たし、水をかけ、台所の窓のそばに置きます。球根が成長し、緑を作り始めます。あなたは緑を切ることができます、そして球根はより多くを作り出します。これは無限の玉ねぎを作る方法ではないことに注意してください 球根、ちょうど緑。
DIYの手順とプロジェクトのクレジット:Dreamgarden101
野菜を保存するために冷凍庫を埋めます。
 Joyful Homeは、濃厚な農場を育てて育て、食料品店を真剣に削減する方法を学びたい場合に興味深いブログです。地下室や地下室がない場合、これは野菜を保存するための優れた選択肢です。メンディは、彼女と彼女の夫がポテトを冬の間保存するために古い冷凍庫をどのように埋めたかについて説明します。春までに、わずかな発芽が起こっただけで、ジャガイモはそれ以外はそのままにしていた。なんてクールなプロジェクトでしょう!
DIYの手順とプロジェクトのクレジット:Joyfulhome
キッチンスクラップから食べ物を育てます。
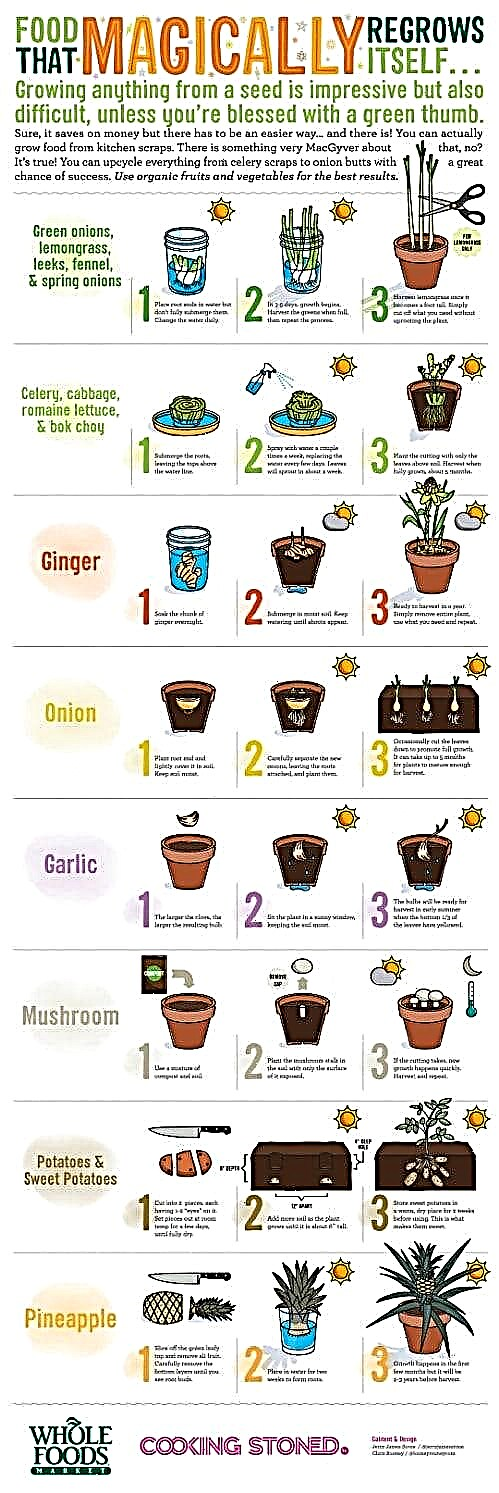 料理中に捨てる野菜スクラップを知っていますか?しないでください!それらの驚くほど多くが実際に食物に再成長することができます。それらを水に入れてから鍋に移すか、最初に鍋に入れます。このインフォグラフィックは、玉ねぎ、レモングラス、フェンネル、ネギ、セロリ、キャベツ、ショウガ、タマネギ、ニンニク、キノコ、ジャガイモ、パイナップルなど、キッチンのスクラップからさまざまな野菜を再成長させる方法を示しています。少々手間がかかりますが、スーパーマーケットの請求額を削減するための素晴らしい方法です。
DIYの手順とプロジェクトのクレジット:Cookingstoned
コウモリの家を建てます。
 コウモリは絶対に魅力的な生き物であり、場所によっては絶滅危惧種です。バットハウスを作ることで彼らを助けることができます。このシンプルな木工プロジェクトは、基本的なツールのみを使用しており、完了するのに数ステップしかかかりません。最大300匹のコウモリが家の中でねぐることができます(もちろん、種によって異なります)。自分の家や小屋でコウモリがねぐらにならないようにしたい場合にも、これは良い考えです。彼らにもっと良い代替案を与えてください。
DIYの手順とプロジェクトのクレジット:Thisoldhouse
バスオーガナイザーをプランターに変える。
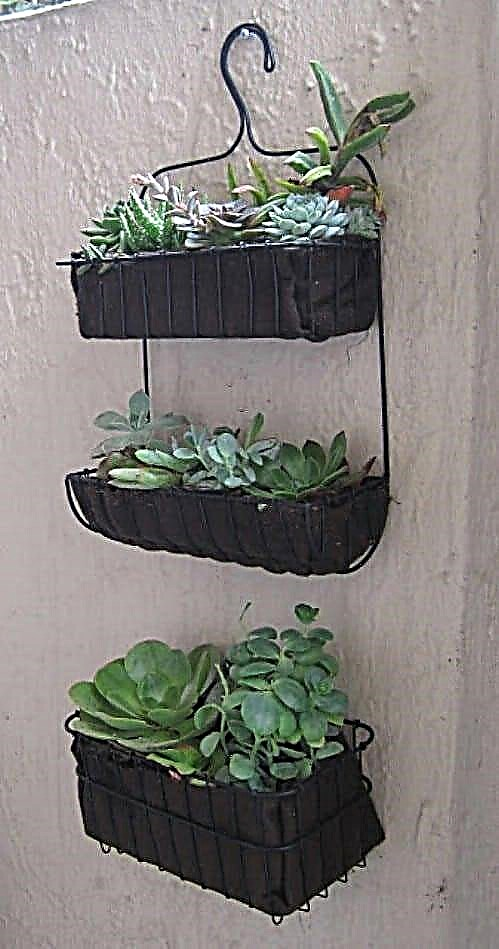 以前から転用されたポケットシューズオーガナイザーが好きなら、このアイデアが気に入るはずです。タオルや石鹸を入れられるバスオーガナイザーを知っていますか? 1つを屋外のパティオの壁に掛けて、代わりにプランターとして使用してみてください。
DIYの手順とプロジェクトのクレジット:Ikeahackers
植物を生き返らせます。
 わかりましたので、できません 本当に 植物が死んでしまえば、植物を生き返らせますが、死にかけた植物を復活させることができます。茶色く柔らかく見えるたくさんの植物がまだ生きています。 LifeHackerは、死んだ茎と葉を刈り取り、植物の日光を約半分に減らし、軽く水をかけることを推奨しています。下にスクロールしてコメントを確認すると、枯れた植物を活性化するためのその他の良いアドバイスも見つかります。
DIYの手順とプロジェクトのクレジット:Gardeningknowhow
鉢植えのおむつを入れます。
 … 何?おむつ?うん、あなたはそれを正しく読みました。鉢植えのそれぞれの底におむつを置いてみてください。なぜそんなことをするのですか。おむつは水分を保持します—それは彼らがするように設計されているものです!彼らはあなたのプランターで同じ仕事をします。それらは鉢植えの植物のしずくを防ぎます。これは、吊り下げた植物に特に役立ちます。おむつは湿気を吸収しているので、通常よりも少し多く水をやる必要があるかもしれません。
DIYの指示とプロジェクトクレジット:Sandpaperandsillyputty
Earthbox®と同様のバケットを作成します。
 If you are familiar with Earthbox®, you know it’s a great system you can use to grow pretty much anything. It’s a great solution if you have a small yard or one with paltry soil conditions. They are expensive, though, and if you are on a budget, it may be better for you to build the equivalent on your own at home! Global Bucket is a low-cost project, fun to make, and very effective for growing a huge range of fruits and vegetables. Click here to watch the how-to video!
DIYの手順とプロジェクトのクレジット:Diyncrafts
Grow a living structure.
 This isn’t a how-to, but it is a great list of ideas with some amazing pictures! A lot of them are pretty standard living structures—beautiful arbors and the like, but a couple of them are really unique, like a living chair or a succulent statue. My favorite one is the grass sofa. Since that would essentially involve nothing more than shaping the dirt and planting the grass, it would be easy to create, produce no strain on the plant, and be effortless to maintain. It’s probably pretty comfortable too!
DIY Instructions and Project Credit: Apieceofrainbow
Easy homemade wasp trap.
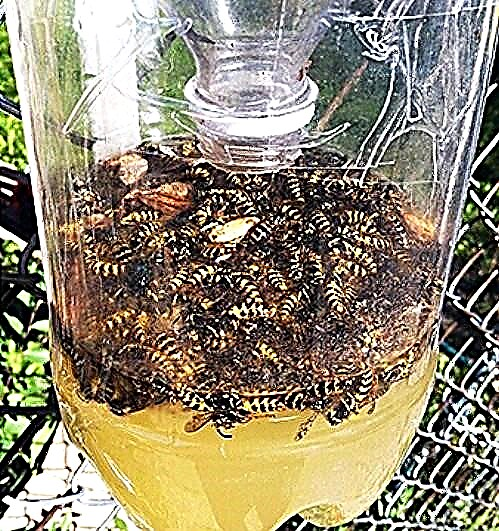 Need to get rid of some pesky wasp buzzing around your home or garden? It’s a good idea to take care of this problem quickly before it turns into a bigger one! This easy home made wasp trap uses a plastic bottle and some sugar water. Judging by the photograph, it’s plenty effective too and will do its job quickly and thoroughly.
DIY Instructions and Project Credit: Apartmenttherapy
Make a watering can out of an old milk jug.
 Looking for an easy way to water your plants, but don’t want to buy a watering can? If you happen to have an old plastic milk jug, all you need to do is heat up a needle and use it to poke a lot of small holes in the lid. Voila, you have a working water can. This is a great way to recycle.
DIY Instructions and Project Credit: Ajourneytoadream
Grow wisteria in a pot.
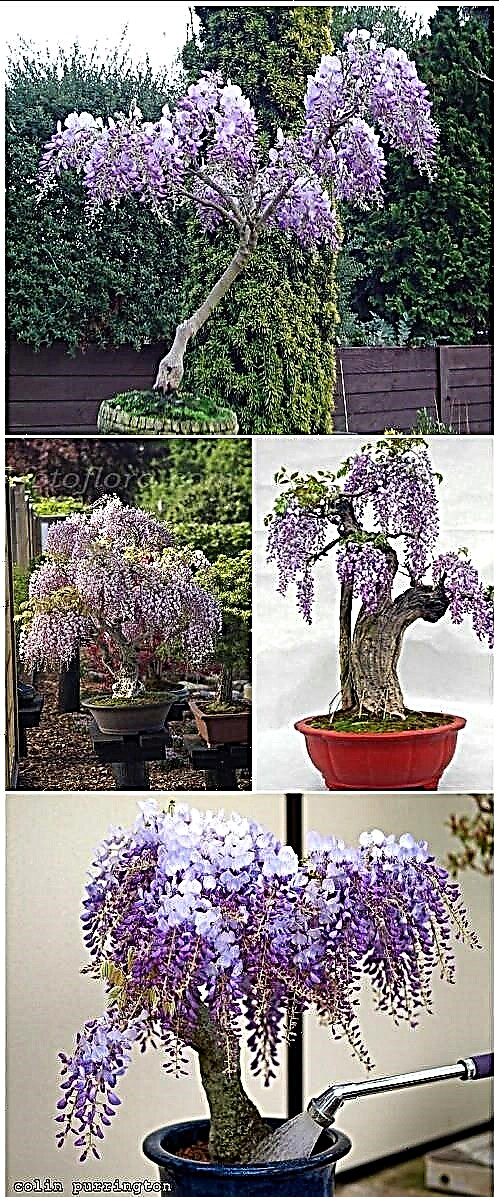 Wisteria is a gorgeous climbing vine that adds beautiful color to a trellis or a wall. Did you know that you can also grow it in a pot? Learn how in ten steps. I actually think these look like little bonsai trees. It looks like a challenging but fun project with beautifully rewarding results.
DIY Instructions and Project Credit: ehow.
Sharpen your old gardening tools.
 Don’t want to throw away your old, dull gardening tools that you’ve had for decades? Well, why should you? With a little sharpening up, they’ll be as good as new, and you’ll be ready to make good use of them again. This post will teach you how.
DIY Instructions and Project Credit: Handy.scout
Turn hydrangeas blue or pink.
 When hydrangeas come in nicely, they are a bold, beautiful color, usually bluish-purplish with a touch of pink. When they don’t come in well though, they are usually a pale, watered down blue with a yellowish tinge—not nearly as impressive. If you want to get your hydrangeas back in all their colorful glory, it turns out it’s just a matter of fixing the pH of your soil. In fact, if you add garden lime, you will turn them pink. If you add soil acidifier, you will turn them blue. There are even products you can purchase to do just that, which makes it super easy! Add the right kind of fertilizer, and you will get the effect you are aiming for.
DIY Instructions and Project Credit: Inmyownstyle
Build a clay pot lighthouse.
 If you love all things nautical, I think you will agree that this is just about the most adorable thing you could do with old clay pots! When I first glanced at it, for a moment I didn’t even realize that what I was looking at was just a few pots stacked one on top of the other—it is very convincing! What an adorable way to light your porch or garden at night and share our love of lighthouses with family and friends.
DIYの手順とプロジェクトのクレジット:Diyncrafts
Make a butterfly feeder in 6 easy steps.
 One of the joys of maintaining a garden is the colorful flowers that come into bloom throughout the year—but the flowers are not the only splash of color to be seen in a garden! Butterflies can also make a dazzling display—but only if you are able to attract them. One way you can do that is by making a butterfly feeder from scratch. The only materials required are common ones, and the whole project only takes 6 simple steps. Check it out here.
DIY Instructions and Project Credit: Hometalk
Learn your succulents.
 Succulent plants are amazing. They can thrive in extremely dry, hot conditions, which makes them relatively easy to care for, and the perfect choice if you live in a desert climate. Check out this chart to learn about lots of different types of succulents which can go great in your own garden.
DIY Instructions and Project Credit: Heitonbuckley
Turn a wine bottle holder into a wall planter.
 This project uses the IKEA Vurm, which is a wine bottle holder. Pint glasses turn out to fit perfectly in the rack, and work great for growing herbs indoors. You could also hang this outdoors on a patio. What a fun and easy project!
DIY Instructions and Project Credit: Curbly
Stencil a pattern on an apple.
 Here’s a cool tidbit. If you have red apples growing on the tree which are still green, you can use a sticker to cover up part of the apple, and that part will remain green after the rest turns red. You can then peel the sticker off and you will have a design on the apple. This is a very cute and clever idea which is perfect for growing apples to give as gifts or to sell or use for any creative purpose.
DIY Instructions and Project Credit: Evetichwill German
Repurpose gutters for strawberries.
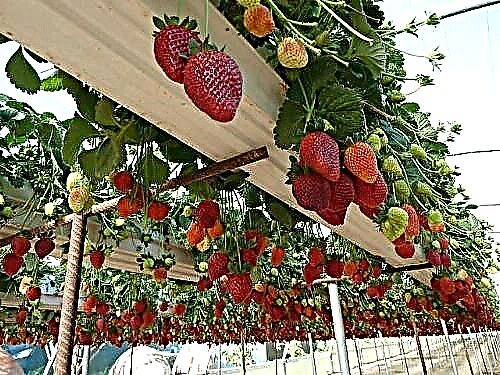 If you want a great way to grow strawberries, try hanging old guttering from welded re-bars. The strawberries grow very nicely from the guttering, and are easy to pick from overhead. There is unfortunately no how-to on this one, but it should not be too challenging to figure it out. Punching some holes underneath would help with drainage.
DIY Instructions and Project Credit: Billyjoesfoodfarm
Make a unique, round garden trellis.
 If you are looking for a fun DIY project that you can build in an afternoon, you will love this idea for making a garden trellis with a unique round shape. The cylinder is just a couple of bike rims, an upright, plus a little garden twine and wire. It is a fast, easy, and fun project with fast results. I would love to see what it looks like once the plants have grown clear up to the top. I bet it has a gorgeous effect!
DIY Instructions and Project Credit: Suitedtotheseasons
Make a cute topsy-turvy stack of gardening pots.
 Check out this super cool stack of planters which seems to defy gravity! At first, looking at this, I was pretty baffled, until I noticed the pole going through the middle. This tutorial will tell you step-by-step what you need and how you can assemble all your supplies to recreate this cool and whimsical effect in your own garden. I imagine that if you grew some draping plants from the pots, you would be able to conceal the pole completely, and the finished look would be even more convincing.
DIY Instructions and Project Credit: Fromdatestodiapers
Make a beautiful tiered herb garden.
 Need a way to save space on a small deck or patio? This tiered herb garden will help you make use of vertical space and free up some room. Frankly, though, even if you had plenty of room to spare on your patio, I think this tiered herb garden would be a terrific project. Just look how gorgeous it is!
DIY Instructions and Project Credit: Decorandthedog
Use glass bottles to edge your garden path.
 Here is a very simple idea that is actually very pretty. Have a bunch of glass bottles lying around, waiting to be recycled? Instead of sending them off to the recycling plant, why not instead use them to edge your garden path? As you can see in the photo, you just push them into the soil upside-down. They probably look even prettier when they catch the light.
DIY Instructions and Project Credit: Thegreenbacksgal
Learn the best tips for growing summer squash.
 Summer squash is very tasty and filling and works great in a lot of recipes. How can you grow the best summer squash with the most success? This blog will teach you the best practices from planting to harvesting so you can enjoy delicious results.
DIY Instructions and Project Credit: Vegetablegardener
Get 48 gardening tips which will help you save money.
 Empress of Dirt is an excellent gardening resource, and this post will provide you with a wealth of amazing ideas for saving money! You will learn how to keep your soil healthy, how to collect rain water and make the best use of it, how to make your own compost, and more. Tips for mulching, planting, and propagation are next. You’ll then learn how you can extend your growing season, repurpose broken junk around your garden for useful and beautiful purposes, and imitate nature for efficiency. You will find so much great information in here. This is a wonderful starting resource for anyone who wants to cut their costs while honing their green thumb!
DIY Instructions and Project Credit: Empressofdirt
Grow your own herbal tea garden.
 Lots of people grow herbs to add to their food in their gardens, but have you ever thought of growing herbal tea? This blog will get you started out right designing your garden and picking herbs. You will also learn tips for harvesting them when they are ready to use as tea. You will learn how to dry them (if that is what you want to do) and store them.
DIY Instructions and Project Credit: Blommi
Create a worm composting bin.
 If you have a plastic storage container and want to learn how to compost at home, this excellent detailed tutorial will teach you all about it. You need about a pound of red worms per two 8-10 gallon plastic totes (you need two totes to make one compost bin). You can mail order the red worms. Why red worms? Earthworms often do not thrive in compost bins, but red worms do.
The blog will teach you the detailed procedure for drilling holes in the compost bin, filling it with the right ingredients, and setting it up in the right spot. You’ll learn what you need to do in order to maintain it and how long to wait before the compost is ready. You’ll also learn what to feed and not feed your compost worms. Very high-quality blog, and an excellent tutorial that could get anyone started on composting!
DIY Instructions and Project Credit: Queenbeecoupons
Build a potting bench.
 Want a nice surface where you can comfortable work on potting your plants? You can assemble this potting bench on your own at home using a couple of pallet boxes. It looks fabulous, and would make for a great workstation!
DIYの手順とプロジェクトクレジット:bhg
Build a real, working greenhouse for just $50.
 Want to put a greenhouse in your backyard, but worried you can’t afford it? Believe it or not, you can purchase all the materials you need to build a fully-functional greenhouse for just $50. That’s if you get the materials used; buy them new and your cost will be closer to $200, which still isn’t bad at all! This is a very detailed tutorial which will teach you all the materials you need, and then provide you with step-by-step assembly instructions, complete with photos. What an impressive project!
DIY Instructions and Project Credit: Doorgarden
Reuse water in your garden.
 If you are looking for a way you can cut back on your water costs, here is one idea. Have some vegetables from your garden you need to rinse? Need to water your garden? Just put a bucket under your colander and rinse your vegetables right there. Instead of letting the water go down the sink drain, you will collect it in the bucket. Then just use it to water your plants. Sometimes the simplest ideas really are the most ingenious ones.
Create concrete hand planters from scratch.
 This is a fun and surprisingly easy project you can do using some really basic supplies. You just need cement for casting, water, a pair of plastic gloves, and a trowel. As you can see, the finished result is both fun and surreal. Scroll down to the bottom and you’ll also find a link to a fun high heel planter tutorial. This lady has a lot of really cool, creative ideas!
DIY Instructions and Project Credit: Diyfunideas
Learn why apple cider vinegar is so awesome to have around in your garden.
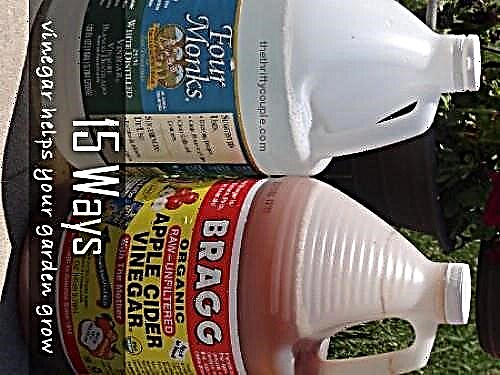 Apple cider vinegar is one of the most handy substances to have around the household. It has literally hundreds of uses, and it turns out that a fair few of them are out in the garden! Apple cider vinegar helps to keep fruit flies away, nourish plants that thrive in acidic conditions, kill mold, get rid of those annoying brown splotches in your grass, and so much more. Discover all the amazing uses here at the Thrifty Couple blog!
DIY Instructions and Project Credit: Thethriftycouple
Discover several great ideas for affordable garden paths.
 If you decide to put a pathway in your garden, you have a bit of an undertaking ahead of you. It can take a great deal of time and work to get a path laid out. But does it have to take a great deal of money? Not if you choose one of these affordable garden path ideas! You will learn the tools needed for all of them as well as the steps for creating each. All of these pathways would be very pretty and cost-effective!
DIY Instructions and Project Credit: Familyhandyman
Up-cycle shoe boxes into seed boxes.
 If you are looking for a nice place to store your seed packets which will help you to keep them organized and easy to access, you can try this project to create a seed box. You just need a large shoebox and some cardboard to start out. You will learn how to create handy dividers with tabs which you can label to help you find specific types of seeds. You can label these with the types of plants, and then you will always know immediately where to look to find what you need, even if you have dozens of seed packets! This project is as thrifty as it is useful!
DIY Instructions and Project Credit: Apieceofrainbow
Make your own hanging macramé candle holders.
 Looking to add a little ambiance to your patio or deck garden after dark? If you have an interest in macramé and want to try your hand at a really simple beginner’s project, these hanging macramé candle holders are for you! You can use them to light your deck or you could string them between trees in your garden. The step-by-step tutorial will teach you how to tie all the right knots with helpful pictures for visual learners. These are really cute and have a nice homespun look to them.
DIY Instructions and Project Credit: Skiptomylou
Create Mason jar solar lights.
 For this project, you will need to actually purchase solar lights, but they are quite inexpensive—you should be able to get them for anywhere from $4-$10 each. You could of course use them as they are, but this project will help you make them pretty! To do that, you need the top of the light, a Mason jar with a relatively wide mouth, some gorilla glue, and a couple of cups of glass gems. The light will shine down into the jar at night and reflect inside the glass gems, making it look like they are glowing. Just think how beautiful it would look if you had a row of these with different colors of glass gems!
DIY Instructions and Project Credit: Myturnforus
Build solar pyramids.
 Speaking of solar, here is a solar project that isn’t for lighting purposes. It doesn’t use solar power to create electricity, but it does harness the power of the sun to help your plants grow in the spring. These solar pyramids were designed by Herrick Kimball of the blog Deliberate Agrarian. In a sense, each solar pyramid functions as a miniature greenhouse. Apparently these pyramids are so good at capturing condensation that you do not have to worry about watering your plants after you get them set up. Wow!
DIY Instructions and Project Credit: Thedeliberateagrarian
Build an amazing beehive that won’t disturb the bees.
 If you have an interest in beekeeping, you should check out this very cool design for a beehive. This design is known as the “flow hive,” and was developed by Cedar Anderson and Stuart Anderson. The frames have open cells; this allows the honey to flow out of a pipe for harvest. That means you do not have to pull the frames out yourself. The bees are not disturbed and neither are you. This is both bee-friendly and human-friendly. While there are no instructions for how to do it, there is a video, and if you are industrious and creative, this may give you some great ideas for how you can redesign your own hive.
DIY Instructions and Project Credit: Boingboing
Glass marble fence décor.
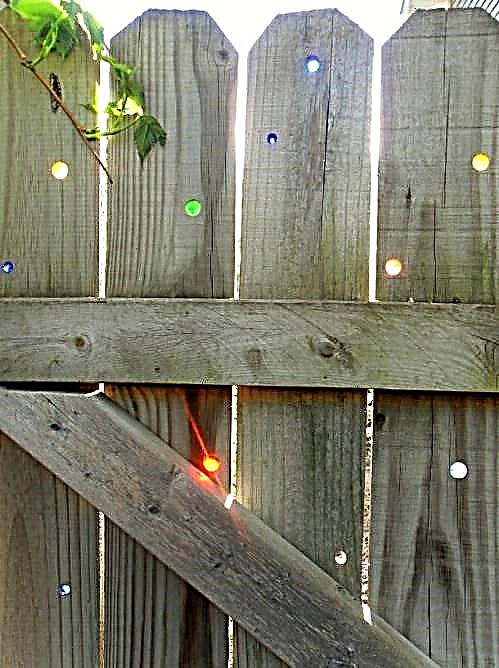 This is such a cute and clever idea for adding some color and pizzazz to your backyard! If you have a wooden fence, just create patterns of holes, as many or as few as you would like, and then push marbles inside. So long as you do a good job with the sizing of the holes, you shouldn’t need any sort of glue to hold them in place. For the best results, go with a west-facing fence. That way when the sun sets, the marbles will all glow with color!
DIY Instructions and Project Credit: Gardendrama
Build a pathway lamppost.
 While this lamppost looks quite sophisticated, it is actually apparently a very easy project which you can complete in a couple of days with some basic supplies. The total cost is around $150. Thanks to This Old House for this one!
DIY Instructions and Project Credit: Thisoldhouse
Grow a sunflower “playhouse” for your kids.
 While it is not obvious from the photograph, this will eventually grow into a sunflower “playhouse.” The round design and the choice of tall plants essentially will turn it into a screened-off “room” in the backyard. This is perfect for children to play in, and makes a great alternative to something like a tree-house if you cannot build one. Your kids will love it so much they will be in it all the time, so as a bonus, you will always know where they are!
DIY Instructions and Project Credit: Rootsandwingsco
Make your planters glow in the dark.
 Why settle for a boring old plastic planter? You can purchase glow-in-the-dark paint and add it to your planters for easy outdoor lighting. When the sun sets each night, they will glow! Imagine a series of these along a garden pathway or lining the edge of a patio or deck. You could use just a splash of glow-in-the-dark color like this, paint the entire planters, or create designs on each one. You can use any colors you choose. This would be a fun project to do with your kids.
DIY Instructions and Project Credit: Hgtvgardens
Turn your old garden tree stumps into something spectacular.
 Old tree stumps don’t have to just sit in your yard taking up space. You can turn them into something magical and beautiful with a few easy steps. This page has several great ideas, including using a garden stump as a natural flowerbed, growing moss on a stump, and turning your tree stump into a base or pedestal for a table or planter. You can even use one to hold a birdbath! These are just a few wonderful ideas. Have a look and you will probably be inspired to come up with even more!
DIY Instructions and Project Credit: Interiorholic
Create a dry creek garden.
 Here is an interesting feature you can add to your garden. It’s low maintenance once you have it set up, and it can give your garden a wilder look. Depending on the stones you choose, you might be able to have it double as a pathway too. Click here to see more photos of dry creek beds you can create along with some helpful tips and tricks.
DIY Instructions and Project Credit: Finegardening.
Recycled tin can lights.
 You can actually purchase these cute lights for your garden. If you have the tools, they might be something you could make from scratch as well. It is certainly a good use to put old tin cans to!
DIY Instructions and Project Credit: Greatgreengoods
Lure in butterflies with this homemade nectar.
 This tutorial will teach you how you can make nectar to attract butterflies to your garden! The nectar itself is really simple; it’s basically just sugar water. You dip the sponge in it and then just hang it from a tree in your garden. This is a great way to draw in butterflies if your flowers alone are not doing the trick.
DIY Instructions and Project Credit: Premeditatedleftovers
Use holiday lights to keep your seedlings warm.
 If you are looking for a way to extend the growing season and keep your seedlings warm during the cooler days and nights of early spring, then don’t put away your holiday lights after Christmas. Instead, add them to your seedling box! They will provide just enough warmth to protect your seedlings, even if you are dealing with freezing temperatures outside. What a clever way to make use of Christmas lights in an unexpected way!
DIY Instructions and Project Credit: Vegetablegardener.
Create seed labels out of canning lids.
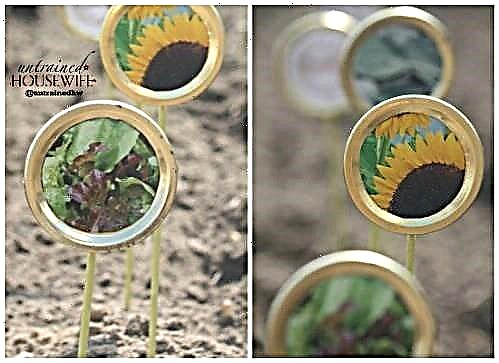 Earlier in the list, I shared a couple of cool ideas for creating seed labels. I really love these canning labels. They look nice and neat, they allow you to recycle, and best of all, you can add images to them and not just words! This is perfect if you are more of a visual thinker. Personally I’d find it much easier to find my way around my seedbed if I labeled like this instead of using words. Each of these little lids is like a window in the future of your garden!
DIY Instructions and Project Credit: Untrainedhousewife.
Learn about vertical gardening.
 If you have limited lawn space, vertical gardening is the best way to use the room you do have available. According to Kathleen Jackson at Starting from Scratch, you need 13 to 18 times more ground space to plant the same amount horizontally that you can plant vertically. If you click through and check out the blog, which I highly recommend you do, you will find detailed instructions to get you started with vertical gardening and saving space.
DIY Instructions and Project Credit: Startingfromscratchchallenge
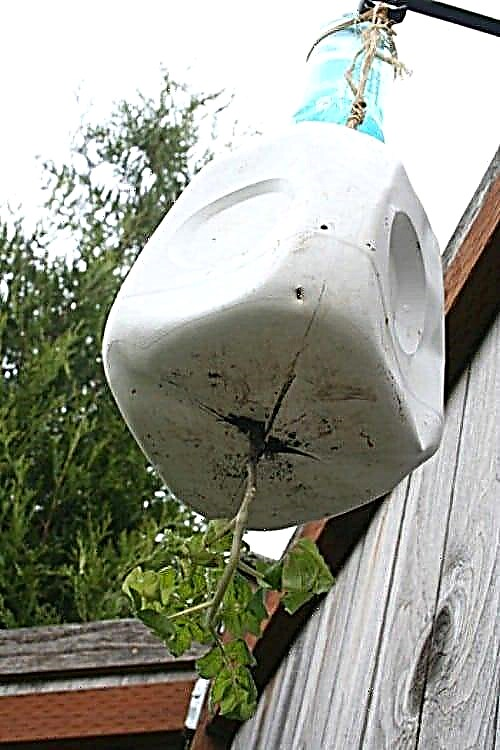
Easy pest control.
 This milk jug from Walter Reeves has to be one of the easiest pest control ideas I have ever seen. Just coat an empty jug with a bug killer of your choice (try to stick with something organic), and put the milk jug up on a post. Bugs will stick to the container and die. You can wash them off and do it again.
DIY Instructions and Project Credit: Walterreeves
Build a ladybug habitat.
 Then again, sometimes you want to attract bugs to your garden! Ladybugs are big helpers for gardeners, which is why you can order them through the mail if you want. A simple and less expensive alternative is to build a habitat to attract them. Just get a hollow pipe and fill it with bamboo, scrap wood, or something similar. Then place it in your garden somewhere convenient. The ladybugs will love making homes out of the little hollow spaces inside. If you do order ladybugs online, I suggest building this home for them anyway—that way they will want to stay in your garden!
DIY Instructions and Project Credit: Marthastewart
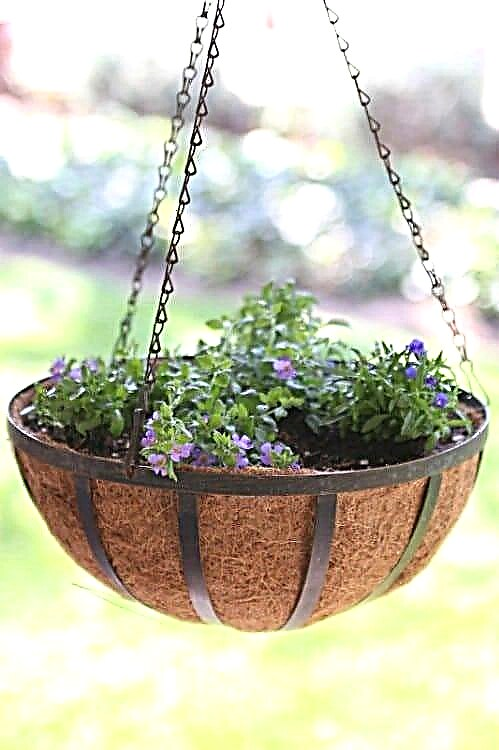
Create a DIY hanging tomato planter.
 Another trick for vertical gardening is to use overhead space. If you have a deck for example or a porch, and you can hang a hook, you can create a hanging tomato planter. While there are no step-by-step instructions, the materials and design look simple enough to replicate.
Source/Image: Cheapvegetablegardener
I hope that you enjoyed all these wonderful DIY garden projects! With these ideas and tutorials, you’ll be able to save money, grow more bountiful fruits, vegetables, and flowers, and enhance your garden with beautiful decorative accents. What are your favorite gardening tips and tricks? Share them with us in the comments below, and if you tried out any of these projects, please share your results!